Saturday, 26 March 2011

"These Aren't The Droids You're Looking For."

Since January 2010 I've been trying to purchase enough of the Star Wars (pre-painted) Miniatures by “Wizards of the Coast” to use for a game based upon the “War of the Ring” rulebook by Games Workshop. Unfortunately as I predominantly wanted to use the minis from the “Rebel Storm” initial release set the entire project has become somewhat cost prohibitive, and essentially 'sat on the shelf' for the last twelve months.

No longer. Having written a 'War Of The Force' homemade ruleset similar to that which I've previously 'showcased' as Unternehemen Seelowe, I've finally managed to get some games in, and thought you may like to 'see' the summary of one in action. Unlike the Weird War battle reports I've not tried to explain the rules along with the narrative, but can do in future if there's any interest in me doing so.

Currently I have only re-based a number of Stormtroopers, Scout Troopers, Imperial Navy Troopers, Rebel Troopers, Tauntaun Riders and a few character models. But I hope to expand upon this over the next month with some Scoundrels, Bounty Hunters, Jawas, Ewoks and (if I can get them cheap enough) some Dewbacks. Though as the models of those cold-blooded reptiles from Tatooine are at least twice that of the Tauntauns (and they cost me a pretty packet at Salute a couple of years ago) I doubt I'll have the numbers I'd like to have.

This first in a series of battle reports covering the Galactic Empire’s search of the galaxy for the missing schematics of the Death Star (after they were ‘lost’ following the pursuit of a Rebel Blockade Runner) sees an Imperial force, lead by Lord Vader, attempt to capture five droids located within an industrial complex on the planet Mustafar.

Once the table was laid out, using pre-painted scenery purchased from the Industrial Range of “Tablescape”, five droid models (objective markers) were placed (at least 10 inches from either deployment edge and from each other) for the forces to battle over. The clash would last for six turns. The Rebels, flanked by two units of Tauntaun Riders, held the southern floor of the factory; with General Kenobi leading three companies of Rebel Troopers beside some large piping in the South West, Princess Leia commanding some Troopers behind some crates in the centre, and Luke Skywalker marshalling a handful of Troopers in the South East.

Lord Vader’s Imperial Force was spread across the Northern length of the factory. The Dark Lord of the Sith, accompanied by a Platoon Leader and a Stormtrooper armed with a T-21 light repeating blaster, personally led a large number of Imperials located close to a pressurised reactor plant in the North East; whilst three squads of Imperial Stormtroopers formed up behind a large collection of radioactive barrels in the centre. A mixture of Imperial Navy troopers, Stormtroopers and Scout Troopers spread out amongst more radioactive barrels in the North West.

At a gesture from Darth Vader, the Stormtroopers and Scout Troopers positioned behind the radioactive barrels in the factory’s North West corner, pushed forward, hoping to find shelter behind a series of large pipes just in front of them. The Imperials were met with a volley of Rebel DH-17 pistol fire. A large number of the blaster bolts struck the Stormtroopers distinctive white plastoid body armour, but only three of the Galactic Empire’s elite soldiers fell. Meanwhile, General Kenobi ordered the Tauntaun riders to the West, to gallop north, straight towards the collection of radioactive barrels some of the Stormtroopers were positioned around. The patrol mounts loped forward, catching the attention of the nearby Scout Troopers who aimed their Holdout blaster pistols only to fire short of their targets.

A squad of Imperial Navy troopers moved up alongside the Scout Troopers, and fired at the riders with their (standard) BlasTech Industries E-11 blaster rifles. These weapons had a better range and badly wounded one of the reptomammals. Concerned that the edge of the Tauntaun’s charge may be blunted by Imperial firepower, Obi-Wan Kenobi directed the surrounding Rebel Troopers’ attention to the surviving Stormtroopers hiding behind a large pipe. Blaster bolts roared into the Imperial position, but were harmlessly absorbed by the Stormtroopers’ armour.

By now the Rebel Alliance’s mounts had galloped even closer to the Scout Troopers, giving the specially trained Imperials, another chance to prove their marksmenship. One of the beasts fell to the ground, despite its thick blubber taking the brunt of the Scout Troopers’ combined firepower. Another Tauntaun was killed by the Imperial Navy Troopers, and for a moment it looked as if the charge was going to fail.

Urged on by their veteran Clone Wars General, the Rebel Troopers desperately tried to pin the Imperials down, and give the remaining Tauntauns some covering fire. The last of the Stormtroopers finally fell before the withering hail of Rebel blaster bolts. However it was still not enough to stop the ‘crack-shot’ Scout Troopers from bringing another of the mounts crashing down. But then with a grunt, the sole-surviving ill-tempered beast was amongst the Imperials and its horns gorged one of the Scout Troopers to death. The victory was only short-lived though, as the rest of the Imperial marksmen dragged the Rebel rider off of his mount, and blasted him at point-blank range with their Holdout pistols.

Enraged by the death of their comrades, the Rebels opened fire upon the remaining Scout Troopers, who dived for cover amidst the pipes surrounding them. One was cut down by the DH-17 pistol fire; whilst another was thrown against one of the nearby metal constructs as a result of a Force Push by General Kenobi. The Scout Trooper’s lightweight armour was no match for the crushing impact.

Sensing his Force’s Western flank was losing ground; Lord Vader dispatched two squads of Stormtroopers (one carrying a T-21 light repeating blaster) towards the remaining Scout Trooper. Then, with a deep rasp, turned his attention to the East where a second patrol of Rebel Tauntaun Riders were fast approaching the Imperial positions. Feeling the eye of the Sith Lord upon them, a nearby squad of Stormtroopers fired a salvo of rifle bolts at the (exposed) beasts, and managed to bring one of the patrol mounts down. Realising that the Imperial soldiers already had their range, the Rebel Tauntaun Riders spurred their reptomammals onwards, losing another one of their number to a hail of E-11 blaster rifle bolts.

However, the gap between the charging Rebels and the Imperial Stormtroopers had closed fast, and with a cry from their riders, the Tauntauns had crashed into the elite soldiers of the Galactic Empire, trampling two into the factory floor.

Darth Vader sensed the fluctuations in the Force, and realised that the Hoth creatures must be held, if he was to capture the droids for his Master. With his lightsabre singing, Palpatine’s apprentice raced towards the Stormtroopers bravingly battling the Tauntauns; whilst at the same time ordering the rest of his Imperial Forces forwards in an attempt to encircle as many droids as posssible.

As he watched the Imperial Forces capture an RA-7 protocol droid that was dithering on a gantry bridge in the centre of the factory, General Kenobi realised his Rebels would never get their hands on more than the Artoo unit and GNK Power droid they’d already rescued this day. With a wave of his lightsabre, he ordered his Rebel Troopers (who were still using the factory’s pipes as cover) to fire a final salvo at the approaching Imperial forces. When that failed to do nothing more than bring down a solitary trooper of the Imperial Navy, it was clear that little else could be done this day to further the Rebel Alliance’s cause, so together with Princess Leia and Luke Skywalker, the Jedi Master signalled the Rebels to retreat. Darth Vader had captured three droids and won the day.

Saturday, 19 March 2011

"Don't Look Away, And Don't Blink."

These “Crooked Dice” models are from the ‘Scary Statue Coven'.

All of the models were initially treated to an undercoat of Chaos Black, before being simply drybrushed with Adeptus Battlegrey and (to a lesser extent) Astronomican Grey. Odd drops of Devlan Mud were then washed into some of the detail, to give the statues a more decayed feel.

Their bases were first given a coat of modelling sand and then painted Chaos Black. The bases were then drybrushed with Dark Flesh and Dheneb Stone, before being washed with Devlan Mud. Finally clumps of static grass was added.

COMING SOON - These models are also from "Crooked Dice" and are from the Game Design Studio's 'Minion Mob'. They are part of a small number of models I've assembled to (hopefully) represent members of the Unit Nations Intelligence Task (UNIT) Force who accompanied Jon Pertwee's Third Doctor in the January 1970 Doctor Who TV Seven-parter "The Cave Monsters". As a result, I've given one something of a moustache...

Monday, 8 November 2010

US Armoured Infantry For “Secrets Of The Third Reich” Project

These “West Wind Productions” models are from the ‘Secrets of the Third Reich’ ‘blister’ US-SOTR-1 “US Amoured Infantry”, but also form part of the SOTR-SP03 US Armoured Infantry Starter Box Set.

All of the models were initially treated to an undercoat of Chaos Black, before their shirts and ankle armour were painted with Dheneb Stone and Devlan Mud. Their body armour was first treated to a coat of Knarloc Green before being given a combined wash of Thraka Green and Devlan Mud. However I just used Knarloc Green and Thraka Green for their helmets, in order to make them stand out a bit more. Their trousers were painted with Calthan Brown and Devlan Mud. Although for the odd model (not pictured) I have used a combination of Dark Flesh and Devlan Mud. All of the gas masks' breathing apparatus and eye lenses were painted with Boltgun Metal before being given a wash of Badab Black.

Back in January 2010 I got hold of a couple of US-SOTR14 ‘US Battle Suit 50 Cal HMG–Comanche’ models second-hand (as part of a pair of SOTR-SP03 ‘US Armoured Infantry’ starter sets). At the time I complained about how dissatisfied I was with the models' joints and that even after some significant drilling and pinning, and some liberal applications of (various) superglues, I still found that the arms continued to droop or the torso fell apart. In the end, I resorted to some generous ‘dollops’ of "Milliput" to ensure a ‘fit’. I was never happy with the final result as I felt that the putty around the arms was so obvious, especially after I managed to fit the second model together without anywhere near as much "Milliput".

In the end, this unhappiness ground me down and in a moment of madness I pulled the beast apart in order to start again. I don't know what shocked me the most, the sheer amount of putty I had used or the fact that it was still soft despite some eight months of being on the model! Anyway, after half an hour of careful scraping, I managed to clean the limbs and set about re-attaching them to the body using "Games Workshop" "Modelling Putty (Green Stuff)". This stuff worked like a charm, and quickly set. Thus I was left with just the problem of repainting the 'damaged bare metal' areas of the battlesuit.

Previously the model had simply been painted with Knarloc Green and a wash of Devlan Mud and Thrakka Green. This time I painted the 'bare metal' areas Dark Flesh in order to build the foundation of a simple camouflage scheme. I painted over a few of the other areas of the model with Dark Flesh as well to expand the pattern. Then I added 'blobs' of Dheneb Stone to these areas and finally some further 'splotches' of Chaos Black. I gave the Deheneb Stone and Dark Flesh areas a wash of Devlan Mud to dirty them up and tie-in better with the rest of the model's Knarloc Green/Devlan Mud/Thraka Green paint scheme. However I still wanted to show that some of the battlesuit's parts had been recently replaced/patched up, so I simply picked out the odd piece of armour with Boltgun Metal and Badab Black.

Saturday, 6 November 2010

An Impulse Buy At Colours

A last minute impulse buy at "Colours" on the 11th September 2010 has resulted in me painting more miniatures in a couple of months than I can ever remember having done before. True, they're my first 'true' attempt to get to grips with the world of 10mm as opposed to my usual 28mm miniature world, but by my standards I've 'slapped a lot of paint on metal' these past couple of months.

The purchase in question was a £20 bag containing a "World War Two German Winter Army Pack" by "Pendraken Miniatures" (pendraken.co.uk). I've always had a hankering to refight Stalingrad but never managed to get the project off of the ground. This time though I was determined to see the thing through. It took another week for the popular 10mm World War Two ruleset "Blitzkreig Commander" to drop through my letterbox, and another couple of weeks for the 'reinforcements' I needed from "Pendraken Miniatures" to arrive, in order for me to be able to field both a 1,000 point German Early Eastern Front Battlegroup and a Russian Early Eastern Front one as well. In addition I also purchased some resin Russian Village buildings, trees and decals from "Pendraken Miniatures". As you see I don't do things by halves.

I've currently made three of these areas of woodland, which for the purposes of "Blitzkreig Commander" will be Impenetrable High Area Terrain. The bases are 1.5mm ply wood movement trays from Fenris Games (fenrisgames.com) with a selection of PNTR1 Deciduous trees 35mm high, PNTR2 Deciduous trees 48mm high and PNTR3 Deciduous trees 50mm high stuck to them with 'green stuff'. The bases were then flocked using some 'sand' I bought elsewhere at "Colours".

Ordinarily I simply base my (28mm) models with "Games Workshop" sand and after a coat of PVA glue to ensure it remains in place, I leave it at that (having added some clumps of static grass). However, having been so disappointed with the the dour effect I'd previously experienced simply gluing “Games Workshop” “Citadel Snow” directly on top of “Modelling Sand” I went just a bit further and actually painted the sand with Chaos Black. I then drybrushed the bases with Dark Flesh and Dheneb Stone, before treating them to a wash of Devlan Mud. Once protected with a seal of PVA glue, I then applied 'drifts' of “Citadel Snow” to the base (as well as to parts of the trees).

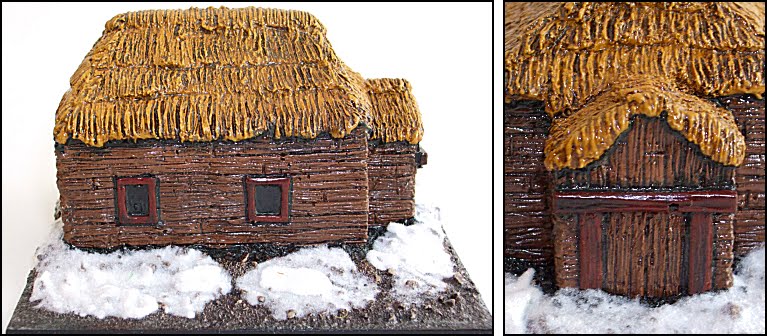
This resin building is PS42 WWII Russian wooded village hall and proved a joy to paint simply (and hopefully effectively). The main wooden structure has been painted with Calthan Brown, whilst the window and door frames were painted with Dark Flesh. Both areas were then treated to a wash of Devlan Mud. The thatched roof was first painted Iyanden Darksun, then washed with Devlan Mud before being drybrushed with more Iyanden Darksun.

This 'second' building was painted in exactly the same way, and is PS40 WWII Russian thatched barn with wooden walls. Both buildings were then based using the same technique as used for my areas of woodland.

Having compiled an 'infantry-heavy' initial 1,000 point German Battlegroup, I still found the points to 'get in' some armour. These are GR77 Panzer I, GR186 Panzer Ib and GR196 Panzer III E/F 37mm gun. I do plan for some of my future armour to have camo patterns but for now 'i just want to get them on the table', thus I went for a simple 'field grey' look. The tanks were initially painted Adeptus Battlegrey before being given a wash of Badab Black. I then drybrushed them with more Adeptus Battlegrey. Their tracks were then 'picked out' with Boltgun Metal, before being washed in Badab Black.

These three units of Waffen-SS are made up from the mixture of miniatures found within the World War Two German Winter Army Pack. As the majority of my infantry units were to be Heer, I wanted these 'bases' to stand out from the regular troops, so gave them all 'field grey' helmets and simply stuck four miniatures to a base, as opposed to the five (which seems the 'BK norm'). Their winter uniforms were simply painted Astronomican Grey before being drybrushed Skull White. Their helmets and the odd piece of field-kit was 'picked out' with Adeptus Battlegrey and washed with Badab Black. Their flesh was painted with Tallarn Flesh, and their rifle butts with Dark Flesh. Both of these areas were then washed with Devlan Mud. Finally, any gun barrels were painted with Boltgun Metal, and washed in Badab Black.

Monday, 1 November 2010

Unternehmen Seelow - "Landing At Lymington"

This is another battle report to 'showcase' my homemade ruleset Unternehemen Seelowe. I've increased the number of special units involved to provide an opportunity for me to once again explain their rules as the narrative progresses. For example, German Para Drop Armour Me362 and more importantly the first of my American forces. In addition, since "The Battle For Bognor", I've updated my ruleset in order to make those Units who can't actually fire more powerful, and therefore be more 'on par' with their 'shooty brethren'. I've also tried to incorporate a bit more information in my photographs, not only about the game mechanics but perhaps what the miniatures themselves were thinking at the time :-)

All the miniatures are from "West Wind Productions" "Secrets Of The Third Reich" range.

This third in a series of battle reports covering the German Reich’s (fictitious) invasion of the United Kingdom in September 1940, sees an Axis force attempt a sea landing at Lymington; a town on the English South East coast, which is currently doubling as a base of operations for a small American force. Each army costs 150 points.

Once the table was laid out, five objective markers were placed for the forces to fight over. These were positioned at strategic areas of interest on the battlefield and consisted of: (1) Lentune Inn – which is situated in the centre of the battlefield; (2) a road (to the Northwest) which turns North deeper into England; (3) a T-Junction on Lymington’s main town road; (4) a field to the Southwest and (5) a coastal farm, located to the Southeast. The encounter would last for ten turns.

The British deployed their Heavy Machinegun Team, Snipers, Bren light machinegun carriers, and two companies of riflemen to the west. Whilst the Americans positioned their two companies of U.S. Armoured Infantry and two U.S. ‘Comanche’ battle suits to the East. The British Parachute Regiment (consisting of one unit of Red Berets armed with Carbine rifles, a second armed with Bren light machineguns and a Recon Airborne Transport (R.A.T.)) held the centre of the line.

The Germans positioned the majority of their Undead units to the east, in order to take the farm [Objective Five]. To the west a single company of Mech Grenadiers armed with Assault Rifles was expected to capture the field [Objective Four]. The rest of the German force, including its Luftwaffe contingent and a Panzershreck team, prepared to rush to the North and challenge for the Inn.

At the start of the first turn, the Allies won the initiative and immediately took Lymington’s T-Junction [Objective Three] with their American contingent. This was followed by the British Regular Army reaching the town’s Northern road [Objective Two] and the British Parachute Regiment pushing south towards Lentune Inn.

In reply a mass of German Zombies and Werewolves reached the farm [Objective Five], whilst the field [Objective Four] was taken by the Mech Grenadiers armed with Assault Rifles. Inspired by the leadership of the Red Baron, the German centre struck Northwards to contest ownership of Lentune Inn. To support this, the Panzershreck team opened fire upon the Red Berets armed with Carbine Rifles, who were ‘screening’ the R.A.T. and killed three of them.


At the start of Turn two, the British Parachute Regiment reached the Lentune Inn [Objective One], and finding it uncontested (yet), dispatched its Bren Light machinegun company further west to support the US Allied contingent. Their extra four firepower was in desperate need, as the Americans opened fire on the horde of Undead that was moving towards them from the Farm [Objective Five]. Three Zombies crumpled to the earth. In the meantime, the British Regular Army also started to fire at the fast approaching German Luftwaffe but without any success.

As the majority of the German centre continued to push North towards the Lentune Inn, the Red Berets once again came under fire from the Panzerschreck Team (as well as from German Snipers). Having effectively lost the protection of its Infantry support on the previous turn, the Recon Airborne Transport (R.A.T.) found itself staggered by two hits despite its Heavy Armour.

Conscious of the anti-tank rockets that were already pummelling the Allied centre, the Americans decided to take the attack to the Axis and pushed South towards the Farm [Objective Five]. Covering the infantry’s advance, the 50 cal Heavy Machineguns of the ‘Comanche’ Battlesuits began firing on more of the oncoming German Zombies, but the walking cadavers Undead flesh seemed imperious to their firepower. Slighty West of the centre of the battlefield the British Regular Army continued to fire at the oncoming German Luftwaffe, and finally scored two hits on the flying menaces. Further West, the British Heavy Machinegun Team opened up upon hearing the howl of a fast-approaching Jager Werewolf. The Undead creature roared with pain as it was twice struck by the bullets.

Spurned on by the pain of the its wounds, the Jager Werewolf leapt into the British Army line and tour at a company of Infantry carrying Carbine rifles. Amazingly though, only one of the brave Tommies fell before its slashing claw and fangs. Across the battlefield, its werewolf brothers heard its bloodlust, and moved up North towards the American troops currently fighting off the German Zombie packs. Once again the R.A.T. became the focus of the Panzerschreck Team’s attention. But this time its Birmingham Steel Heavy Armour plating held it in good stead.


Eager for living flesh, the German Undead Zombie packs finally got their teeth into the American forces. A well-placed chomp penetrated the armour of one of the Battlesuits, whilst four US Armoured Infantrymen fell before the claws of two German Werewolves. In the centre of the battlefield, a rocket from the Panzerschreck team hit the R.A.T. again.

It was clear to the Allied Command that they had to hold their Eastern flank against the German Undead horde, if Lymington was not to fall, so orders were quickly given for the second US Armour Battlesuit to engage the Living Undead in hand-to-hand combat. Driven on by the loss of their comrades, the American infantry swung their rifle butts at the snarling Jagerhund Alsatian, and the beast miraculously went down under the blows. Meanwhile the British held Western flank continued to fire upon the Luftwaffe, scoring another two hits on the three flying German battlesuits.

Realising that the American Contingent could collapse if placed under enough pressure, a company of German Mech Grenadiers joined the melee taking place just North of the Farm [Objective Five]. In the centre of the battlefield, just North of the Lentune Inn [Objective One], more German Mech Grenadiers also resorted to fierce hand-to-hand combat; this time with the British Commanders themselves. To the far West, the British Regular Infantry fighting off the vicious claws and snapping fangs of the Jager Werewolf quickly met their bloody ends.

Desperate to ensure they did not meet a similarly gory demise, the British Heavy Machinegun Team, turned their full attention upon the Jager Werewolf and poured bullets into the beast. Three struck the snarling fiend, but only a single round penetrated its unholy hide.

Incensed by the stinging pain of the attack, the were-creature leapt amidst the cowering Heavy Machinegun team and tore two of the three-man crew to bloody ribbons. North of the Farm [Objective Five], more American soldiers were also meeting their demise at the hands of the Undead Axis forces. To make matters worse for the Yanks, one of their US Battlesuits was close to being opened like a sardine tin by the claws of a Zombie Pack. Determined to stave off the great German offensive the British Parachute Regiment had previously moved south in order to firm up the centre of the Allied line. Now they fell heavily before the combination of the pinpoint accurate firing of the German Sniper Team and the raw explosive power of the Panzerschreck Team. When the dust settled the R.A.T. continued to stand, albeit with less armour plating than it carried before, but it now stood alone… the Red Berets carrying Bren Light Machineguns having been wiped out to a man.


It was clear that the Allied Army was close to losing ground, predominantly thanks to the German’s Undead horde ‘bogging down’ the majority of their forces whilst the Panzerschreck and Sniper Teams took their toll from a distance. Powering up the vehicle’s weapons the pilot of the R.A.T. was determined to turn this tide and gunned down one of the German sharpshooters. Inspired, the British Regular Heavy Assault Company (carrying Bren Light Machineguns) and the British Sniper Team engulfed the German Mech Grenadier’s armed with Assault Rifles in a hail of Tommy lead, and slaughtered them to a man. To the East, the threat of the Americans being overrun by Zombies was thwarted as a U.S. Battlesuit finally crushed one of the Zombie Packs in hand-to-hand combat. Beside it, the other ‘Comanche’ similarly despatched a company of German Mech Grenadiers.

Unfortunately, the Americans cheers were swiftly silenced as the Panzerschreck Team blew up the U.S. Battlesuit that moments before had been victorious over the Nazi Undead menace. Suddenly disheartened one of the U.S. Armoured Companies finally fell below the crushing jaws of the German Jagerhund Rottweiler. The were-creature was not to enjoy its meal for long however as the combined charge of the surviving American forces swiftly felled it.

The battle was fast approaching its climax as the British R.A.T. desperately waded into the German forces contesting the Lentune Inn [Objective One]. With a strike from one of its mechanically enhanced arms, the vehicle smashed a Zombie to pulp, before finding itself surrounded by the Undead fiends. Behind the Recon Airborne Transport, the British Sniper Team had just the time to shudder at the shrill howl of the Jager Werewolf, before the beast was upon them and had ripped them apart. Exhausted the Allied Forces began to slowly withdraw from the town, silent and sullen at the thought that the German’s had finally established a bridgehead for invading Britain.

Sunday, 11 April 2010

Unternehmen Seelowe – “The Battle For Bognor”

This is another battle report to 'showcase' my homemade ruleset Unternehemen Seelowe. I've increased the number of special units involved to provide an opportunity for me to explain their rules as the narrative progresses. For example, more German Undead in the shape of Werewolves, Command Units (Officers) and British Armoured Suits. As a result it may be worth re-reading my earlier post as I've tried (in the main) not to cover the rules explained in "The Selsey Landing". The miniatures are all from "West Wind Productions" "Secrets Of The Third Reich" range.

This second in a series of battle reports covering the German Reich’s (fictitious) invasion of the United Kingdom in September 1940, sees an Axis force attempt to establish a base of operations on the outskirts of Bognor Regis; a seaside resort town on the English South East coast. Each force can only consist of infantry units, and cost 100 points.

Once the table was laid out, five objective markers were placed for the forces to fight over. These were positioned at strategic areas of interest on the battlefield and consisted of: (1) a field surrounded by bushes in the Southwest; (2) an area of settled coastline in the Southeast; (3) the centre of the battlefield; (4) a T-Junction on Bognor’s coastal road to the Northwest and (5) the residential outskirts of Bognor town to the Northeast. The encounter would last for six turns.

The British, having already started work on some barbed wire barricades following the failed Axis landing at Selsey, deployed the British Parachute Regiment (consisting of one unit of Red Berets armed with Carbine rifles, and a second armed with Bren light machineguns) to the west of the town. The majority of the defending force however remained within the outskirts of the town, including the British Commandos, a Heavy Weapons Team and a Heavy Machinegun Team.

The Germans fielded a strong Undead centre, placing their Sniper Team between two units of Zombies and a Werewolf. Alongside these unholy horrors, and in front of the German Mech Grenadier Command Unit, a unit of Mech Grenadiers were deployed knee-deep in the sea as it snaked its way northwards, culminating into an inland pool (near Objective Two).

At the start of the first turn, the British won the initiative and so could move/fire/fight (hand-to-hand) with all their units before the German’s turn began. The main body of the defending force pushed forwards south of Bognor’s residential buildings. In particular the British Parachute Regiment advanced down the west flank of the battlefield towards the field [Objective One] in order to ensure the German’s couldn’t outflank the British from that direction at least without a fight.

Tucked away besides a building in the most eastern part of the residential outskirts, the British Sniper Team opened fire on the ‘overly exposed’ German Infantry wading up towards the settled coastline [Objective Two]. The (two) Snipers have the special ability Long Range; so can shoot at anything up to 30 inches away as opposed to the normal shooting range of 20 inches. The marksmen also have the special ability Sharpshooter, which means that instead of ordinarily hitting an exposed (vulnerable) target on the roll of a 4, 5 or 6 (using a D6), they would hit a target on the roll of a 3, 4, 5 or 6. Amazingly though, having presumably missed their Bully Beef breakfast, the Snipers rolled a 1 and 2, and failed to hit the Axis ‘sitting ducks’. The Bazooka Team (positioned just east of the Red Berets) also have the special ability Long Range, so opened fire on one of the units of German Zombies. One of the animated corpses fell to the earth. Like the majority of combatants, the Living Dead have the special ability Armour. Ordinarily this means that in order for their armour to save them and so they can remain on the battlefield, a ‘casualty’ needs to roll a 6 on a D6. However the Bazooka Team also have the special ability Armour Piercing, which put simply, cancels out any opponents Armour ability. First (coagulated) blood to the British.

At the beginning of the Axis turn, the ‘weakened’ Zombie Pack activated its Regeneration special ability. This allows a player, at the start of their turn, to roll a D6 for each missing model within the unit. Upon the roll of a 6, that model is ‘returned’ to the unit. However on this occasion no corpse returned to its feet. Enlivened by the British Sniper fire pinging around them, the German Mech Grenadiers hauled themselves out of the water to claim the settled coastline [Objective Two] for the Fatherland. The ‘unscathed’ unit of Zombies and a Jager Werewolf soon joined them. To the Southwest the second Zombie Pack and more Germany Infantry (armed with automatic rifles) clambered over a hedgerow to enter the field [Objective One].


Far Southeast the German Panzerschreck Team utilised its Long Range and Armour Piercing and blew up a single Tommy emerging from the residential outskirts of Bognor. The German Sniper Team also fired, aiming their sights on the ‘steam-powered’ British Armoured Suit who was just starting to cross the Bognor dirt road (running east to west just south of the residential outskirts). One bullet struck the British steel clad warrior. Because the marksmen were close to the German Mech Grenadier Command unit, the Sniper Team was able to call upon its officer’s Command [German] special ability and (re)fire its missed shot. A unit with Command allows any friendly unit (as defined within the Command parenthesis) that is within 12 inches of it to re-roll a single dice roll once per turn. Unfortunately the retaken shot also missed. Even more disappointingly for the Axis Forces, the British Armoured Suit has the Heavy Armour special ability. This means that in order for their (heavy) armour to save them a ‘casualty’ needs to roll a 5 or 6 on a D6; and the encumbered British soldier did just that. Finally the German Heavy Weapons Team blazed away at the oncoming British Parachute Regiment, felling two of the carbine-carrying Tommies.

Having won the initiative, the Germans ensured they had a ‘tight’ hold of the settled coastline [Objective Two] with their Mech Grenadiers by pushing the accompanying unit of Zombies and the Werewolf further North, towards the British line. To the Southwest the second Zombie Pack and unit of Germany Infantry took position of the field [Objective One].

The German Panzerschreck Team continued to fire anti-tank rockets at the British Infantry emerging from the buildings of Bognor, and killed another two brave soldiers. The German Sniper Team also kept the British Armoured Suit in their sights, but those shots that struck the steel plating were frustrated by the thickness of the armour. To the west, another Red Beret fell before the assault rifles of the German Heavy Weapons team.


Facing a withering hail of Axis firepower, the British gritted their teeth, remained in position and simply unleashed upon the Germans all that Queen and Country could muster. In the centre of the line, the Heavy Machine Gun Team poured bullets into the Zombie Pack approaching them from the coastline, returning three of the putrid cadavers back beyond the grave. To the West, inspired by their own British Command unit, the British Commandos slew two of the Zombies stumbling towards them from the field [Objective Two]. A blaze of fire from their Bren light machine guns saw the British Heavy Weapons Team finish this particular horde of the Undead off. The British guns then turned their attention to the German Infantry in the field, and the Armoured Suit dispatched one Jerry with his handheld Vickers machine gun. Two more of the Mech Grenadiers fell to a bazooka blast, leaving a solitary German stood alone in the middle of (but still holding) the field [Objective Two]. To the far West, a German Jagerhund Alsatian had steadily been moving forward amidst the cover of some farm buildings. Having finally emerged the Undead beast faced the British Parachute Regiment, and with a howl of pain and anger took two wounds as a result.

The British won the initiative for the third turn of the battle and bravely took the centre of the battlefield [Objective Three] with a unit of Commandos. Then, with the exception of their Command unit moving south in support of the British Infantry, the Tommy firing line remained stationary, gripped their weapons and prepared to give the Hun ‘more of the same’.

Inspired by their earlier success at dispatching the Undead, the British Heavy Weapons Team turned their light machine guns upon the remaining German Zombie Pack, and gave a hearty cheer when the last of the walking corpses fell still. The Heavy Machine Team therefore turned their sights upon the German Infantry holding the coastline [Objective One] and thanks to their Command unit being within appropriate proximity struck the Mech Grenadiers five times. No amount of body armour was going to save the Fatherland’s ‘favoured’, and the entire German unit was wiped out to a man. The sole surviving German Infantryman in the field fared equally as poorly, being gunned down by the British Armoured Suit. With no closer targets available to them, the British Bazooka Team turned their attention to the German Sniper Team and fired its high explosive round (four dice) at them. Because the Axis marksmen have the Camouflage special ability, an enemy unit always suffers –1 to its dice roll when firing at them, so the British unit needed to roll a 6 to hit them. Therefore despite the ferocity of their barrage only one of the Nazi crack shots was killed. Finally, somewhat understandably unnerved by the slavering man-dog tearing towards them, the two units of Red Berets only managed to inflict a single further wound upon the Undead German Jagerhund Alsatian.


Devastated by two turns of withering British fire the Axis Forces moved quickly to try and penetrate the British line, and gain a foothold on the English Southeast coast. The Jagerhund moved itself into range so as to charge the Red Berets in the next turn. The Jager Werewolf moved itself into a similar position, facing the British Commandos in the centre of the battlefield [Objective Three] over a barbed wire barricade. Both the German Panzerschreck Team and the Sniper Team tried to provide the red-furred beast support by firing at the Commandos, but only one Tommy was slain. To the West the German Heavy Weapons Team finally put an end to the unit of Red Berets armed with Carbine rifles.

With howls of bloodlust, the Axis Forces won the initiative for the fourth turn of the battle, and immediately charged their were-creatures into their respective foes. In addition the German Heavy Weapons Team placed their assault rifles over their shoulders and started to clamber over the hedgerow that formed the perimeter of the field. The Germans would need to take and hold this plot of earth if they were to have any hope of ‘winning the day’ and establishing their Axis beachhead.


Unfortunately the impact of the German firing was less than was hoped for as only the Panzerschreck Team scored a hit, and that saw just one of the three-man British Heavy machine Gun Team fall.

However, the British Forces were left reeling from the hand-to-hand onslaught of the German were-creatures. The Jagerhund Alsatian, who easily tore through their body armour, slaughtered the entire British Parachute Regiment to their last Red Beret. Equally as devastating was the assault by the German Werewolf upon the British Commandos, who were quickly cut down to a man by tooth and claw. In a matter of seconds the entire British line was about to be broken by Lycanthropy.

Blazing away with his Vickers machine gun into the Jagerhund Alsatian, the British Armoured Suit gave the were-creature a taste of British steel and dispatched the beast, saving the British line from faltering. In the centre the Heavy Machine Gun Team also poured lead into the Jager Werewolf, and amazingly, with three wounds inflicted upon it, it too fell dead to the ground. Inspired by their colleagues shooting, the British Bazooka Team once again turned their attention to the German Sniper Team and killed the remaining marksman with a high explosive round.

Despite having taken a heavy toll upon the Axis Forces, and being numerically superior, the British Army were still without an objective, and so having won the initiative for the penultimate round, set about moving all of its surviving units South in order to ‘take the battlefield’.

Demoralised and battered, the German Forces still clung to the slight hope of holding off the British Tommy and achieving a draw, if they could recapture the field [Objective One], the Coastline [Objective Two], and contest for the centre of the field of battle [Objective Three]. As a result, those meagre Germans alive forded water and hurdled hedgerows in their advance Northwards.

Both the British and the Germans rolled the same for the Initiative roll for the sixth and final turn. The Fatherland therefore went first because if the roll is a draw, then the player who went second in the previous turn gets to go first. The German Panzerschreck Team therefore crossed the water and, despite being horribly ‘out in the open’, reached the Coastline [Objective Two]. The German Mech Grenadier Command also rushed forwards, clambering up and over a hill in their desire to reach the centre of the battlefield [Objective Three]. Desperate to ward off any British unit daring to enter and contest the field [Objective One], the Mech grenadiers armed with assault rifles riddled the oncoming British Armoured Suit with bullets, but could only cause two of the four wounds needed.

Spurred on by the ‘invulnerability’ of his British steel suit, the ‘mechanized’ Tommy crashed through the hedgerow and into the field [Objective One], ensuring the Germans didn’t solely hold the ground. The British Command unit rushed and claimed the centre of the battlefield [Objective Three]. The British Heavy Weapons Team remained just outside the residential outskirts [Objective Five], whilst the Bazooka Team ensured it ‘stayed put’ on the Bognor Road T-Junction [Objective Four].


Determined to make the Axis Forces pay for daring to mount a second raid upon the English Southeast coast, the British Sniper Team ‘picked off’ both members of the Panzerschreck Team, vacating the area of settled coastline [Objective 2] of any soldiers whatsoever. The Heavy Machine Gun Team also opened fire, this time upon the fast approaching Mech grenadier Command unit. Three of the German officers crumpled to the ground dead, with the fourth ‘offiziere’ only saved from an inglorious death by his body armour. However the ‘leutnant’ was only given a momentary respite, as the British Heavy Weapons Team quickly gunned him down. In an effort to completely eradicate the invaders the British Bazooka Team fired upon the German Heavy Weapons Team. However only one Mech Grenadier fell before the onslaught of the high explosive rounds.

With the battle over, it was now a simple matter to determine who had ‘won the day’ by counting who held the most objectives on the battlefield. Inspired by some Armour saves earlier on, the British Armoured Suit had marched southwest far enough (within six inches) to challenge the German Mech Grenadiers armed with assault rifles for the field [Objective One]. As a result neither side could claim the ploughed soil as exclusively theirs; nor could either force claim the unoccupied coastline [Objective Two]. However the British had taken and held the centre of the battlefield [Objective Three], the T-Junction on Bognor’s coastal road to the Northwest [Objective Four] and the residential outskirts of Bognor town to the Northeast [Objective Five], giving Churchill’s men a strong and decisive victory over the invading German Forces.

Friday, 2 April 2010

Rasputina And The Cult Of December

Having purchased them from “MCS Miniatures” (mcsminiatures.co.uk) in November 2009, I've only recently completed painting this “Wyrd Miniatures” boxed set of the “Cult Of December”. Originally bought as an introduction to the “Malifaux” rule set, my enthusiasm for this mini-project has remained relatively strong, despite my decision not to actually purchase the rulebook (or gaming card decks). Instead I plan to use these 28mm metal miniatures as a possible alternative as ‘ghosts’ for “Ganesha Games” “Song of Blades and Heroes” horror skirmish rule set “Fear and Faith”.

All three of the “Ice Gamin” were undercoated with Mordian Blue and then generously washed with Asurmen Blue. The single-piece metal models were then ‘dry-brushed’ Mordian Blue and Ultramarines Blue. Their claws, toenails and spines were ‘picked out’ first with Chaos Black, and then Skull White. These areas were then treated to a wash of Devlan Mud. Their eye sockets were first painted Chaos Black, before a tiny ‘dot’ of Skull White was used for their eyes.

“Rasputina” was undercoated Chaos Black and then ‘dry-brushed’ Mordian Blue for her skirt. Her stockings were painted Dheneb Stone and Devlan Mud, whilst her sash was painted Mechrite Red and Baal Red. To make her skin appear icy and cold, it was painted Skull White and Asurmen Blue. Areas such as her nose, cheeks, thighs and fingers were then ‘picked out’ with Skull White, and all of her flesh was again treated to a wash of Asurmen Blue. The Arcanist’s bearskin armour was painted with Fortress Grey and then washed with watered-down Asurmen Blue. However, to make the cuffs, collar and hat stand out they were painted using Codex Grey and Devlan Mud. These areas were then ‘dry-brushed’ Fortress Grey. Ice Blue and Asurmen Blue was used for her hair.


As with the “Ice Gamin”, the “Ice Golem” was undercoated Mordian Blue and then washed with Asurmen Blue. However the four-piece metal construct was then heavily ‘dry-brushed’ with Fortress Grey before being given a light ‘dry-brush’ of Skull White.

The “Hoarcat Pride” was bought separately from the “Rasputina” boxed set and proved fiddly beyond belief, as each model (despite its tiny size) came in two pieces. Each beast was undercoated Codex Grey and then washed with Devlan Mud. The pride were then ‘dry-brushed’ Fortress Grey before and Skull White. Their eyes were ‘picked out’ with Blood Red.

With the exception of the “Ice Golem” and the one of the three “Ice Gamin” models, the “Rasputina” “Cult Of December” set has proved somewhat disappointing. Two of the “Ice Gamin” figures appear to have been ‘squished flat’, whilst painting “Rasputina” herself proved a real test due to the uninspiring nature of the (rather frail and thin-looking) figure. At £4.50 the “Hoarcat Pride” does seem somewhat overpriced for what the blister actually contains but the “Malifaux” range is expensive.

An additional demoralising disappointment was the dour effect simply gluing “Games Workshop” “Citadel Snow” directly on top of “Modelling Sand” had for the miniature’s bases.