This is another battle report to 'showcase' my homemade ruleset Unternehemen Seelowe. I've increased the number of special units involved to provide an opportunity for me to once again explain their rules as the narrative progresses. For example, German Para Drop Armour Me362 and more importantly the first of my American forces. In addition, since "The Battle For Bognor", I've updated my ruleset in order to make those Units who can't actually fire more powerful, and therefore be more 'on par' with their 'shooty brethren'. I've also tried to incorporate a bit more information in my photographs, not only about the game mechanics but perhaps what the miniatures themselves were thinking at the time :-)
All the miniatures are from "West Wind Productions" "Secrets Of The Third Reich" range.
This third in a series of battle reports covering the German Reich’s (fictitious) invasion of the United Kingdom in September 1940, sees an Axis force attempt a sea landing at Lymington; a town on the English South East coast, which is currently doubling as a base of operations for a small American force. Each army costs 150 points.
Once the table was laid out, five objective markers were placed for the forces to fight over. These were positioned at strategic areas of interest on the battlefield and consisted of: (1) Lentune Inn – which is situated in the centre of the battlefield; (2) a road (to the Northwest) which turns North deeper into England; (3) a T-Junction on Lymington’s main town road; (4) a field to the Southwest and (5) a coastal farm, located to the Southeast. The encounter would last for ten turns.
The British deployed their Heavy Machinegun Team, Snipers, Bren light machinegun carriers, and two companies of riflemen to the west. Whilst the Americans positioned their two companies of U.S. Armoured Infantry and two U.S. ‘Comanche’ battle suits to the East. The British Parachute Regiment (consisting of one unit of Red Berets armed with Carbine rifles, a second armed with Bren light machineguns and a Recon Airborne Transport (R.A.T.)) held the centre of the line.
The Germans positioned the majority of their Undead units to the east, in order to take the farm [Objective Five]. To the west a single company of Mech Grenadiers armed with Assault Rifles was expected to capture the field [Objective Four]. The rest of the German force, including its Luftwaffe contingent and a Panzershreck team, prepared to rush to the North and challenge for the Inn.
 At the start of the first turn, the Allies won the initiative and immediately took Lymington’s T-Junction [Objective Three] with their American contingent. This was followed by the British Regular Army reaching the town’s Northern road [Objective Two] and the British Parachute Regiment pushing south towards Lentune Inn.
In reply a mass of German Zombies and Werewolves reached the farm [Objective Five], whilst the field [Objective Four] was taken by the Mech Grenadiers armed with Assault Rifles. Inspired by the leadership of the Red Baron, the German centre struck Northwards to contest ownership of Lentune Inn. To support this, the Panzershreck team opened fire upon the Red Berets armed with Carbine Rifles, who were ‘screening’ the R.A.T. and killed three of them. 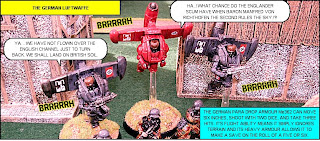 At the start of Turn two, the British Parachute Regiment reached the Lentune Inn [Objective One], and finding it uncontested (yet), dispatched its Bren Light machinegun company further west to support the US Allied contingent. Their extra four firepower was in desperate need, as the Americans opened fire on the horde of Undead that was moving towards them from the Farm [Objective Five]. Three Zombies crumpled to the earth. In the meantime, the British Regular Army also started to fire at the fast approaching German Luftwaffe but without any success.
As the majority of the German centre continued to push North towards the Lentune Inn, the Red Berets once again came under fire from the Panzerschreck Team (as well as from German Snipers). Having effectively lost the protection of its Infantry support on the previous turn, the Recon Airborne Transport (R.A.T.) found itself staggered by two hits despite its Heavy Armour.
Conscious of the anti-tank rockets that were already pummelling the Allied centre, the Americans decided to take the attack to the Axis and pushed South towards the Farm [Objective Five]. Covering the infantry’s advance, the 50 cal Heavy Machineguns of the ‘Comanche’ Battlesuits began firing on more of the oncoming German Zombies, but the walking cadavers Undead flesh seemed imperious to their firepower. Slighty West of the centre of the battlefield the British Regular Army continued to fire at the oncoming German Luftwaffe, and finally scored two hits on the flying menaces. Further West, the British Heavy Machinegun Team opened up upon hearing the howl of a fast-approaching Jager Werewolf. The Undead creature roared with pain as it was twice struck by the bullets.
Spurned on by the pain of the its wounds, the Jager Werewolf leapt into the British Army line and tour at a company of Infantry carrying Carbine rifles. Amazingly though, only one of the brave Tommies fell before its slashing claw and fangs. Across the battlefield, its werewolf brothers heard its bloodlust, and moved up North towards the American troops currently fighting off the German Zombie packs. Once again the R.A.T. became the focus of the Panzerschreck Team’s attention. But this time its Birmingham Steel Heavy Armour plating held it in good stead.
 Eager for living flesh, the German Undead Zombie packs finally got their teeth into the American forces. A well-placed chomp penetrated the armour of one of the Battlesuits, whilst four US Armoured Infantrymen fell before the claws of two German Werewolves. In the centre of the battlefield, a rocket from the Panzerschreck team hit the R.A.T. again.
It was clear to the Allied Command that they had to hold their Eastern flank against the German Undead horde, if Lymington was not to fall, so orders were quickly given for the second US Armour Battlesuit to engage the Living Undead in hand-to-hand combat. Driven on by the loss of their comrades, the American infantry swung their rifle butts at the snarling Jagerhund Alsatian, and the beast miraculously went down under the blows. Meanwhile the British held Western flank continued to fire upon the Luftwaffe, scoring another two hits on the three flying German battlesuits.
Realising that the American Contingent could collapse if placed under enough pressure, a company of German Mech Grenadiers joined the melee taking place just North of the Farm [Objective Five]. In the centre of the battlefield, just North of the Lentune Inn [Objective One], more German Mech Grenadiers also resorted to fierce hand-to-hand combat; this time with the British Commanders themselves. To the far West, the British Regular Infantry fighting off the vicious claws and snapping fangs of the Jager Werewolf quickly met their bloody ends.
Desperate to ensure they did not meet a similarly gory demise, the British Heavy Machinegun Team, turned their full attention upon the Jager Werewolf and poured bullets into the beast. Three struck the snarling fiend, but only a single round penetrated its unholy hide.
Incensed by the stinging pain of the attack, the were-creature leapt amidst the cowering Heavy Machinegun team and tore two of the three-man crew to bloody ribbons. North of the Farm [Objective Five], more American soldiers were also meeting their demise at the hands of the Undead Axis forces. To make matters worse for the Yanks, one of their US Battlesuits was close to being opened like a sardine tin by the claws of a Zombie Pack. Determined to stave off the great German offensive the British Parachute Regiment had previously moved south in order to firm up the centre of the Allied line. Now they fell heavily before the combination of the pinpoint accurate firing of the German Sniper Team and the raw explosive power of the Panzerschreck Team. When the dust settled the R.A.T. continued to stand, albeit with less armour plating than it carried before, but it now stood alone… the Red Berets carrying Bren Light Machineguns having been wiped out to a man.
 It was clear that the Allied Army was close to losing ground, predominantly thanks to the German’s Undead horde ‘bogging down’ the majority of their forces whilst the Panzerschreck and Sniper Teams took their toll from a distance. Powering up the vehicle’s weapons the pilot of the R.A.T. was determined to turn this tide and gunned down one of the German sharpshooters. Inspired, the British Regular Heavy Assault Company (carrying Bren Light Machineguns) and the British Sniper Team engulfed the German Mech Grenadier’s armed with Assault Rifles in a hail of Tommy lead, and slaughtered them to a man. To the East, the threat of the Americans being overrun by Zombies was thwarted as a U.S. Battlesuit finally crushed one of the Zombie Packs in hand-to-hand combat. Beside it, the other ‘Comanche’ similarly despatched a company of German Mech Grenadiers.
Unfortunately, the Americans cheers were swiftly silenced as the Panzerschreck Team blew up the U.S. Battlesuit that moments before had been victorious over the Nazi Undead menace. Suddenly disheartened one of the U.S. Armoured Companies finally fell below the crushing jaws of the German Jagerhund Rottweiler. The were-creature was not to enjoy its meal for long however as the combined charge of the surviving American forces swiftly felled it.
The battle was fast approaching its climax as the British R.A.T. desperately waded into the German forces contesting the Lentune Inn [Objective One]. With a strike from one of its mechanically enhanced arms, the vehicle smashed a Zombie to pulp, before finding itself surrounded by the Undead fiends. Behind the Recon Airborne Transport, the British Sniper Team had just the time to shudder at the shrill howl of the Jager Werewolf, before the beast was upon them and had ripped them apart. Exhausted the Allied Forces began to slowly withdraw from the town, silent and sullen at the thought that the German’s had finally established a bridgehead for invading Britain.

 These “West Wind Productions” models are from the ‘Secrets of the Third Reich’ ‘blister’ US-SOTR-1 “US Amoured Infantry”, but also form part of the SOTR-SP03 US Armoured Infantry Starter Box Set.
 Back in January 2010 I got hold of a couple of US-SOTR14 ‘US Battle Suit 50 Cal HMG–Comanche’ models second-hand (as part of a pair of SOTR-SP03 ‘US Armoured Infantry’ starter sets). At the time I complained about how dissatisfied I was with the models' joints and that even after some significant drilling and pinning, and some liberal applications of (various) superglues, I still found that the arms continued to droop or the torso fell apart. In the end, I resorted to some generous ‘dollops’ of "Milliput" to ensure a ‘fit’. I was never happy with the final result as I felt that the putty around the arms was so obvious, especially after I managed to fit the second model together without anywhere near as much "Milliput".