Sunday 30 August 2015

28mm Battle Report: Gotham City High-Rise - Batman Verses The Riddler

BATMAN AND ROBIN BATTLE THE RIDDLER AND TWO-FACE ATOP GOTHAM CITY
This test game was played essentially using the “Pillow A-go-go” ruleset, which I believe was originally made available as a free PDF by Australian-based company “Fiendish Fabrications”. However as we’re planning on using it as the basis of a superhero verse villain ‘Gotham City High-rise’ campaign, a few modifications were made in order to start to give the “brutal pillow combat” more of a “DC Comics” feel. The battle took place on a rectangular 7” x 9.5” rooftop created using some of the resin scenery from the Streetwise: Flatroof range by “Ainsty Castings”.  

“The story so far… Accompanied by Commissioner Gordon, the Caped Crusaders have been chasing the Gentlemen Ghost across the Gotham City night skyline. Having trapped him on top of a tall high-rise building however, they’ve discovered that Jim Craddock was actually just luring them to a deadly confrontation with the Riddler and Two-Face. All bets are off as the masked vigilantes realise only one side shall rule this night, whilst the losers will plummet to a grisly ‘splat-sounding’ death…”
THE TABLETOP - A 7" x 9.5" ROOFTOP MADE FROM "AINSTY CASTINGS" RESIN SCENERY PIECES 
As per the “Pillow A-go-go rules” each of the combatants’ three attributes were allotted points in order to represent their appropriate ‘fighting style’. Of note both Robin and Edward Nygma were each awarded one point of Attack, Defence and Agility, whilst Harvey Dent was given three points of Attack to represent his vicious all-out offensive mindset. The Gentlemen Ghost was actually bestowed with two points of defence and one point of Agility to better embody the phantom’s spectral intangibility. In addition instead of being armed with pillows our participants were (still randomly) allocated 
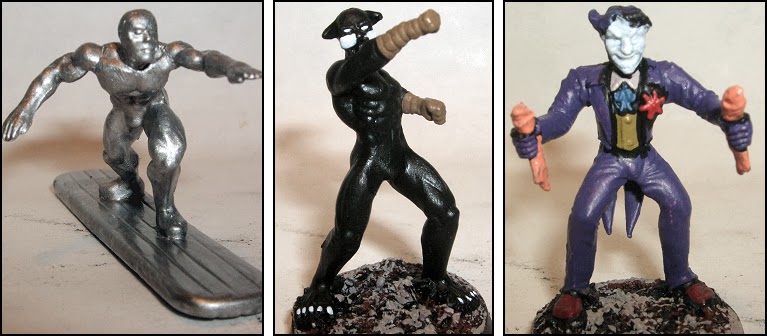
weapons such as Batman’s batarangs (two attacks), the Riddler’s question mark cane (knocks back opponent by 2 inches” and Two Face’s pistol (+1 to hit).
THE RIDDLER RETURNS TO CONFOUND THE DARK KNIGHT AND BOY WONDER YET AGAIN
The fight started with Commissioner Gordon rushing towards the Riddler, whilst Batman, preparing his Nth metal knuckledusters, moved towards the Gentleman Ghost. Robin leapt towards Two-Face, and using a ‘dirty trick’ pulled the gangster into him, thus preventing the disfigured district attorney from moving until they broke free (by winning a combat contest). Realising that his fellow criminals had been somewhat slow off the mark, and perhaps more importantly had their backs to the south edge of the rooftop, Jim Craddock moved between Batman and Gordon and attempted to hit the Dark knight with an ‘Over Head Stunner’. Unfortunately for the undead villain, the Caped Crusader managed to get a punch in first, knocking the apparition back an inch. Elsewhere the Riddler missed the elderly policeman with his can. But watched with satisfaction as Two-Face angrily ‘round-housed’ the Boy Wonder on to the edge of the rooftop’s eastern wall…
OBIN CONFRONTS TWO-FACE. BUT SOON FINDS THE CRIME BOSS IS A TOUGH NUT TO CRACK
Once again the Gentleman Ghost tried to ‘Over Head Stun’ Batman, and yet again was forced back an inch having been pre-emptively socked in the face and tottered dangerously on the edge of the western wall. The Dark Knight followed it up with another wallop and the phantom would have fallen to his certain doom, if not for his ability to fly as a spectral spirit. But Jim Craddock was out of the action… momentarily at least. Encouraged by the masked vigilante getting the better of his foe, Gordon forced Edward Nygma back an inch and watched as Robin vaulted back to safety around Two-face and also attacked the Riddler. A melee was certainly starting to form down by the rootop’s southern edge, and Harvey Dent added to its confusion by forcing the Commissioner further south with a flurry of shots from his pistol.
BATMAN DISPATCHES THE GENTLEMAN GHOST AS TWO-FACE ATTACKS JIM GORDON
Having dispatched the Gentleman Ghost, Batman confronted his quizzical arch-nemesis and gave him a taste of ‘The Hammers of Justice’ with a ‘Double Whammy’. Nygma was not only knocked back an inch but also stunned until the end of the turn. However as a house rule it was decided that being stunned not only meant that the model was unable to make any attacks until the end of the turn. But that they lost any points allocated against their defence attribute for the turn as well. Sensing the forces of good were in ascendancy, Two-Face got behind Gordon and automatically shoved him south an inch between Batman and the Riddler. Meanwhile Jim Craddock, because he could fly, was allowed to float four inches around the edge of the rooftop, looking for an opportunity to grab any hero foolish enough to within touching distance (one inch).
DEAD BUT NOT DEFEATED. GENTLEMAN JIM CRADDOCK REMAINS DESPITE FALLING TO HIS DEATH
Realising the battle could soon be won Robin pushed the Riddler back onto the southern edge of the rooftop with a blow from his stave. But then grunted in frustration as Nygma swiftly leapt behind the youth and pushed him two inches towards a plummeting death himself. Was this really going to be the end of Tim Drake? Batman meanwhile started to try and trade blows with Harvey Dent. But neither combatant hit with any of their attacks.
THE RIDDLER LURES ROBIN INTO A PRECARIOUS POSITION AS BATMAN BATTLES TWO-FACE
Jim Gordon decided to wrestle with the Riddler. But having failed to strike the green-costumed villain suddenly found himself reeling sideways as a result of a blow from Nygma’s question mark cane. With a cry the veteran policeman realised he going to be sent sprawling three inches southwards and was suddenly over the edge of the rooftop and hurtling downwards as fast as gravity could take him. With a triumphant yell Two-face launched an attack upon the Boy Wonder, and automatically (as he attacked from behind) forced Robin forwards over the southern edge of the rooftop. However the fiend had left himself dangerously close to the stone-capped brick wall himself and with grim determination Batman pushed Harvey Dent over the rooftop edge as well.
ROBIN FALLS TO HIS DOOM, FOLLOWED BY TWO-FACE AND THEN... THE DARK KNIGHT HIMSELF
Realising everything now boiled down to him and the Riddler, the Dark Knight launched an attack upon Edward Nygma and forced the villain back an inch. But moving swiftly the purple-masked criminal recovered and using his Agility to slipping around the Caped Crusader, pushed the hero two inches south with his cane. Tottering on the edge, with his back to his enemy, Batman had a brief opportunity to look out across Gotham City, before he was sent tumbling by another blow from the Riddler’s question mark walking stick…

This battle was a lot of fun, and although the slightly larger arena (as “Pillow A-go-go” is designed to be played on a 6”x6” “Supra-King Size bed”) meant that at times models were reasonably safe stood in the centre of the rooftop, it still took less than an hour to game. In addition this contest was played with a completely clear rooftop, so the addition of a chimney stack and perhaps some debris should dramatically alter the dynamics of the fights.

For those interested in the comic book exploits of Edward Nygma, then my review of the “DC Comics” 2013 one-shot Riddler story “Solitaire” can be found here:

Friday 28 August 2015

'Gotham City High-Rise' - WIP - Part Four

The Flatroof Starter Set contains various sized walls, some corners, a skylight, air ducts, airbox tile and roof tiles
This Gotham City high-rise 'arena' measures 7" x 9.5" and was constructed using pieces from Ainsty Castings” terrific “Streetwise: Flatroof” resin scenery range. In fact the majority of the pieces came from the manufacturer's code 8300A Flatroof Starter Set.

To begin with I took a rectangular-shaped section of medium-density fibreboard and super-glued a number of ‘edging wall’ pieces around its circumference in order to create a solid non-movable border for my rooftop. This process actually took significantly longer than I expected as I soon found that none of the resin castings had the same dimensions as one another, so I ended up shuffling them around until they all fitted together.
As the central tiles aren't fixed down they can be moved about to create a variety of rooftops
 Once dry, I gave the entire model an undercoat of “Citadel” Abaddon Black before painting the brick walls with several coats of “Vallejo” Heavy Red. I then applied a very rough wash of “The Army Painter” Strong Tone Quickshade to these areas in order to help bring out the detail in the pieces. As I wanted the roof’s surface to be rather dark and easy to paint I simply used a combination of “Vallejo” Bluegrey and “Citadel” Nuln Oil. Finally I painted the stone capping with “Vallejo” Heavy Brown, washed it with Strong Tone Quickshade and then dry-brushed it with more “Vallejo” Heavy Brown. The entire assembly was then given a coat of PVA glue in order to help seal up any tiny gaps between the resin and provide the paint-job with a somewhat rubbery protective coat.

In addition I have also finished painting one of “Ainsty Castings” wonderful Chimney stacks. This model was painted very similarly to my rooftop in order to better fit in with its surroundings. Although in order to make the pots stand out a bit more I actually dry-brushed them with “Vallejo” Bluegrey after washing them with “Citadel” Nuln Oil. 
Rooftop WIPs - All the pieces have been under-coated using "Vallejo" Bluegrey
As I want to have plenty of choice regarding what debris will be littering my rooftop, I’ve started work on a few other pieces from the company’s Streetwise: Flatroof range, including a skylight, air duct and junk pile. 

Tuesday 25 August 2015

"You're Fidgeting Around Like A Daggit On A Sunspot."

"When these fires reach hyper-combustion, the whole planet's gonna blow!"
This 28mm metal miniature of the D-Ranger codenamed Helios is made by “Nexus Miniatures” and is model NX13 from their “Superhero Dinosaur Zombie Apocalypse” range. The figure comes in two pieces and makes a wonderful proxy for Captain Apollo, as played by Richard Hatch in the 1978 Science fiction television series “Battlestar Galactica”.

The Colonial Warrior was initially undercoated with “Vallejo” Heavy Brown before his jacket was painted using Heavy Sienna. The model’s shoulder-pads and boots were then given a coat of Charred Brown. Finally his jacket’s buttons and shirt collar were picked out with Gold. All of these areas were then washed with “The Army Painter” Strong Tone Quickshade. In addition I also painted one of the captain’s belt straps with a combination of “Vallejo” Gold and Strong Tone Quickshade as my TV show reference material depicted the character stowing a handful of large ammunition rounds by his holster. As the metallic colour would break up the somewhat monotonously black mid-drift of the miniature I thought just painting one such area in this way should make the ‘bullets’ stand out.
D-Rangers WIPs - Both Joey and Galicia are close to completion
 Sticking with my collection of “Nexus Miniatures” I have managed to make some considerable headway on these two other D-Ranger models, Codenamed Galicia and Joey. These sculpts are absolutely full of character and I’ll probably pick up another set along with a couple of D-Ranger Helmet sprues to provide me with additional ‘nameless’ Colonial Warriors.
American Agents WIPs - Early days yet but the truth is out there...
 In addition I have also started work on these two American Agents. Having only undercoated Sculder and Mulley and ‘boxed off’ their separate areas with black I still have a lot to work to do in order to get them finished. However these sculpts are significantly slighter in size than the D-Rangers, so shouldn’t be that time-consuming to complete. I have also managed to drill and pin the manufacturer’s Visor head to this cracking sculpt of a Psychic Hero F.O.N. Operative and given my ‘Cyclops’ a blue undercoat.

Sunday 23 August 2015

"No One Knows Where He Came From..."

"Why did he take up the mantle of a Guild Ball Captain?"
This 28mm metal miniature of Blackheart is from The Union Starter Set for “Guild Ball” and is made by “Steamforged Games Limited”. It comes in several pieces so required some considerable supergluing, and later pinning, before I could finish painting him. Indeed the dynamic sculpt was truly a burden to paint and on several occasions I found my paintbrush struggling to reach some of the especially difficult areas hidden beneath the character’s sword-arm.

As the model’s main ‘kit colour’ was going to be red, I undercoated the entire piece with “Vallejo” Heavy Red before picking out his arm and leg armour with some Gunmetal Grey. This metallic acrylic produces a rather well-worn effect once washed with “Citadel” Nuln Oil, so was perfect for implying that the star player’s gear had been used for many a match. For the more ‘showy’ silver areas of Blackheart’s costume, such as the clips of his cloak, the front of his padded vest, his chain-links, and formidable sword blade, I used the “Citadel” Layer Ironbreaker instead.
Mister Freeze WIP - The "DC Comics" villain now needs part of his armour painted silver
For the player’s main leatherwear I applied a combination of “Vallejo” Heavy Sienna and “The Army Painter” Strong Tone Quickshade. For the skipper’s bicep leatherwork however I went and used the darker “Vallejo” Charred Brown instead. Finally I applied a wash of Strong Tone Quickshade over all the remaining “Vallejo” Heavy Red areas, and tried to ensure the ‘ink’ pooled in the hard to reach recesses so as to cover over any mistakes.

Whilst desperately trying to resist the temptation to chuck my central midfielder miniature out the window, I have also been working away on my ever increasing collection of “Heroclix” models. Having previously washed Mister Freeze with black shade I have now not only finished dry-brushing him but have managed to undercoat the areas of his suit which will be silver in colour. I’ve also started working on the white layers for his ‘frosted’ helmet.
"Wizkids" WIPs - All three of these models are actually close to completion
In addition I have been ‘picking away’ at my miniatures of Wildcat and the Joker. The Clown Prince of Crime is especially detailed and colourful, but should soon be finished once these tiny areas, such as his shirt, tie and flower, have been washed with ink.

Lastly I have been spending a considerable portion of my time trying to finish off the plethora of “DC Comics” characters I own. But having spent a so long concentrating on the minute details upon figures, I thought this “Wizkids” sculpt of the Silver Surfer from “Marvel Worldwide” would prove an easy distraction; once I’d drilled it so as to utilise one of lovely  transparent flight stands by “Moongoose Publishing” that is.

Friday 21 August 2015

"You've Upstaged Me For The Last Time, Batman. Time To Bring Down The Curtain."

"You know what I'd have given for a death scene like this? Too bad I won't get to... read the notices."
This 28mm plastic “Wizkids” model of (the second) Clayface is miniature number 9 from the Batman Alpha DC Comics “Heroclix” range. The treasure hunter who originally immersed himself in a mysterious radioactive pool of protoplasm in a cave first appeared in the December 1961 issue of “Detective Comics” and was created by Sheldon Moldoff and Bill Finger.

initially given an undercoat of “Vallejo” Heavy Sienna before being washed with “The Army Painter” Strong Tone Quickshade. The supervillain’s safe and steel girder were painted using a combination of “Vallejo” Gunmetal Grey and “Citadel” Nuln Oil. Matt Hagen’s eyes were initially picked out with some “Vallejo” Heavy Ochre before being washed with Strong Tone Quickshade and then highlighted with a dab of more “Vallejo” Heavy Ochre.
"Heroclix" WIPs - A black wash has been applied to Mister Freeze, whilst the others need some detailing
Whilst working on evil shape-shifter I have also been paying a little attention to these “Wizkids” models of Mister Freeze, Rasputin and Cyborg. I’m especially grateful to Roger over on the “Rantings From Under The Wargames Table” blog for the ‘Mad Monk’, who once finished should be able to provide my Bureau for Paranormal Research and Defense (B.P.R.D.) miniatures some much needed opposition.
Battlestar Galactica WIPs - Apollo just needs his buttons, collar and weaponry being picked out in gold
Finally I have almost complete the first of my three D-Rangers by “Nexus Miniatures”. I simply need to paint Captain Apollo’s buttons and belt with gold for the Battlestar Galactica” Colonial Warrior to be finished, and as a result have already started to build up some layers of this wonderful representation of Lieutenant Starbuck.

Tuesday 18 August 2015

"Why Can't You Just Die?"

"Ah. Fortune smiles. Another day of wine and roses. Or, in your case, beer and pizza!"
This 28mm plastic “Wizkids” model of Two-Face is miniature number 21 from the Batman Alpha DC Comics “Heroclix” range. The disfigured district attorney for Gotham City first appeared in the August 1942 issue of “Detective Comics” and was created by Bob Kane and Bill Finger.

Because the model’s pre-paint was actually overly thick I avoided undercoating the figure and instead applied a layer of “Citadel” Abaddon Black and “Vallejo” White over his two-piece suit and shoes. In order to make life simple for me I painted his usually monotone tie with “Heavy Blue” and then washed it with “Citadel” Asurmen Blue. For Harvey Dent’s disfigured face and hand, I used a combination of “Vallejo” Heavy Red with “The Army Painter” Strong Tone Quickshade. Finally for the crime lord’s hair I applied “Vallejo” Heavy Sienna and Heavy Bluegrey and washed them with more Strong Tone Quickshade and “Citadel” Nuln oil respectively.
Captain Apollo WIP - Once the face is completed, he will only need some inking and gold buckles highlighted
Whilst waiting for the former ally of Batman’s flocked base to dry, I have been paying some considerable attention to this first of three D-Rangers by “Nexus Miniatures”. This somewhat large 28mm metal miniature will make a fine stand-in for Captain Apollo of “Battlestar Galactica” fame.
OMAC WIP - One of the easiest "Heroclix" miniatures I've painted
In addition, as I’m somewhat eager to build up a sizeable Brother Eye cyborg force of “Heroclix” figures, I’ve also almost finished my test OMAC “Wizkids” robot. An extremely simple miniature to paint, I’ve undercoated, washed and then dry-brushed the ‘cape-killer’ with metallic blue, and now need just pick out a few details before he’s finished.

Sunday 16 August 2015

'Gotham City High-Rise' - WIP - Part Three

Superhero WIPs - Both Steel and Wildcat should be soon ready for the tabletop
Having finally settled upon a colour scheme for my Gotham City high rise rooftop I have not only managed to finish applying a third coat of “Vallejo” Heavy Red to the interior of my brick walls. But also finished the actual roof’s shingle coating itself using a combination of “Vallejo” Heavy Bluegrey and “Citadel” Nuln Oil. Now I need only ‘cut in’ the walls’ stone capping and the interior of my outer rooftop will be complete… Although I may well add a little brown ink to the ground just to break up the decidedly monotone look.
Resin rooftop WIP - Just the stone capping to complete and the rooftop's interior will be finished
 These “Wizkids” models should all be able to play a sizeable role in my planned ‘Battle for Gotham City’ campaign. I’ve yet to decide upon the actual costume paint scheme to use for Batgirl as she has had so many. But Barbara Gordon will almost certainly be predominantly grey with a blue cape and cowl so as to tie-in with my Batman figure. Steel should prove a fairly straight forward paint-job with his all-metallic physique and simple red cape. Wildcat however will undoubtedly be the easiest to finish though as I’ve already painted his all-black ‘gym-attire’.
Supervillain WIPs - Plenty left to do on these various 28mm plastic baddies 
 In addition I have also been basing-up some notable-looking henchmen and a ‘guest-star’ supervillain. This Vampire Roustabout is actually a “Horrorclix” model, and like so many of the figures I own from this range was a greatly appreciated gift from Bryan of “Vampifan’s Wolrd Of The Undead” fame. I don’t actually plan on using the ‘heavy’ as a vampire (for now at least). But thought he’d make an impressive bruiser for one of the Crime Bosses; possibly even for the Joker in view of his giant hammer.

IMAC is actually a test model to see just how well the figure paints up before I commit to buying a number of the miniatures to use as robot minions. Finally I thought Man-Bat would prove an interesting loner, who may well suddenly swoop down upon a battle simply because the noise and activity has attracted his attention.

Friday 14 August 2015

"The Most Famous, Most Fearsome Monster Of All!"

"It's -- alive! Heaven help me -- It's alive!"
This 28mm plastic “Wizkids” model of Frankenstein’s Monster is miniature number 10 from the Amazing Spider-Man Marvel “Heroclix” range. Mary Shelley’s creation made his first appearance in the ‘Marvel Comics Universe’ by featuring in writer/Editor Stan Lee’s September 1953 issue of “Menace”. Despite the horror character’s somewhat crouched pose, the figure still stands at an impressive 43mm in height.

Because this miniature’s pre-paint was thick enough I didn’t need to undercoat the figure at all and instead simply applied a layer of “Vallejo” Heavy Blue directly onto the creature’s trousers. This area was then washed with some “Citadel” Asurmen Blue. Frankenstein’s fur-jacket was painted using a combination of “Vallejo” Heavy Sienna and “The Army Painter” Strong Tone Quickshade. Finally I painted the monster’s skin with “Vallejo” Heavy Bluegrey, before giving it a healthy wash of “Citadel” Nuln Oil.
"DC Comics" WIPs - Both Joker and Sergeant Rock still require quite a bit of painting time
 Having completed replicating the ‘basics’ of the figure’s “Wizkids” paint-job, I then desperately tried to go one better and not only ‘pick out’ the monster’s numerous stitches in “Citadel” Abaddon Black. But also then paint them with more “Vallejo” Heavy Sienna, before washing each suture with more Strong Tone Quickshade.

Unfortunately not only did this make the miniature look extremely messy. But despite my best efforts I simply couldn’t just ‘pick out’ each thread without the brush tip occasionally straying elsewhere. In the end, and for my own personal sanity’s sake, I decided that enough was enough, and actually purchased a second model in order to start again. Ultimately however, I have simply repainted the monster’s grey flesh with “Vallejo” Heavy Bluegrey and once again washed the areas with “Citadel” Nuln Oil. Before leaving the brutish creation well enough alone…
D-Rangers WIPs - These 'colonial warriors' will be predominantly brown with gold trimmings
Having completed a “Marvel Worldwide” miniature I have also been progressing more “Heroclix” figures from the company’s “DC Comics” ranges. My Clayface is now almost finished, and simply needs a brown wash and his yellow eyes to be ‘dotted in’. Whilst both my Joker and Sergeant Rock have quite a considerable way yet to go.

I have also managed to separate the main colour areas on these three D-Rangers by “Nexus Miniatures”. Helios, Galicia and Joey all bear a striking resemblance to the Colonial Warriors Apollo, Starbuck and Boomer from the 1978 American television series “Battlestar Galactica”. 

Tuesday 11 August 2015

"You Cannot Mesmerise Me! I'm British!"

"Oh, they're so excitable, like all foreigners."
This metal model of Professor Peter Cushion is from “Antediluvian Miniatures” range of 28mm Adventurers. The sculpt is seemingly based upon the character of Doctor Abner Perry, a somewhat stereotypical potty Victorian scientist who features in the 1976 Fantasy-Science Fiction film “At The Earth’s Core”.

The figure was initially undercoated with “Citadel” Abaddon Black and then dry-brushed with “Vallejo” Heavy Charcoal. I then painted the character’s shirt and sleeves with White before washing these areas with the some Pale Grey. In order to break up the predominantly monochrome colour scheme, I picked out the model’s umbrella handle with a combination of Charred Brown and “The Army Painter” Strong Tone Quickshade. I also applied a mixture of “Citadel” Ironbreaker and Nuln Oil to Peter’s waist chain and monocle. Finally the elderly adventurer’s hair and moustache were painted with “Vallejo” Heavy Bluegrey and more “Citadel” Nuln Oil.
Frankenstein's Monster WIP - The creature's flesh has been completely repainted
Having finished applying the red and silver layers to my somewhat squat-looking Clayface “Heroclix” plastic figure, I’ve subsequently managed to wash the supervillain’s safe and steel girder with black ink, and the somewhat scenic brickwork with brown ink. In addition I have finally repainted this rather formidably-sized Frankenstein “Wizkids” miniature. The pre-painted figure actually had the creature’s obvious stitching ‘picked out’ in black. But when I attempted to replicate this painting technique, and even try to go one better by additionally colouring the stitches with brown, I found that the model simply looked a complete mess. As a result I have repainted all the monster’s skin areas and may now simply leave them alone having also reapplied a “Citadel” Nuln Oil wash.
Blackheart WIP - The Pirate King's face is finally close to completion
Lastly I have been persevering with my “Guild Ball” miniatures. These models have proved a real challenge, not least because my Blackheart model came unstuck during the painting process. Now however, I have finally started work on the Pirate King’s face, and just need to tidy up the Union Team captain’s eyes before I concentrate on his predominantly red cloak. I have also started applying the foundation layer to Rage’s white shirt and blood-spattered waist towel.

Sunday 9 August 2015

'Gotham City High-Rise' - WIP - Part Two

Two-Face WIP - The former Attorney just needs his face, hair and gun painted before being finished
Continuing my project to create and game some rooftop shenanigans atop Gotham City’s skyline, I’ve not only managed to make a little progress on one of the metropolis’ more notorious criminal bosses, Two-Face. But also re-start painting yet another “Heroclix” model from Batman’s Rogues Galley, Basil Karlo – also known as Clayface.

Indeed the somewhat cartoony looking miniature has actually given me an opportunity to see how well “Vallejo” Heavy Red works as the basic layer for bricks, and as a result of ‘testing’ the colour out on the figure’s debris-laden base I’ve subsequently applied a couple of coats of the opaque water-based acrylic to my “Ainsty Castings” rooftop. Hopefully the resin scenery will only require another couple of layers, over its black undercoat, before I can wash it with some brown ink and get to work picking out the walls’ cream(ish) stone capping.
Mister Freeze WIP - The ice-cold criminal's suit will be a mixture of metallic paints
I have though also rebased and undercoated one of “Wizkids” better sculpts of Mister Freeze. Originally I had hoped to retain the miniature’s clear plastic head dome, which allows you to see Victor Fries’ face inside. Unfortunately though the quality of the pre-paint was atrocious as the bright red used for the supervillain’s goggles had been plastered all over the head. Having considered removing the head and reattaching it having tried to repaint it somehow, I finally decided that, somewhat disappointingly, the easiest and probably best solution, was going to be to simply paint the dome white… then wash it with some grey ink before dry-brushing with more white.

As a result of painting my “Ainsty Castings” rooftop, I’ve taken the opportunity to ‘dig out’ the rest of my resin ‘furniture’ and started to work out some different scenery configurations for my combatants to fight over. The company’s Chimney Stack is a particularly formidable-looking piece, and should certainly help ‘break up’ the semi-large over space of a roof. I’ve also found myself owning a number of pieces of air ducting which I’m not entirely sold on; predominantly because they’re rather delicate and without some serious preparation work look rather easy to snap off of the roof. It make therefore be that I simply superglue a couple of pieces into the odd corner, rather than have them ‘snaking’ around…
Pigeon Loft Roof Shed WIP - The large resin piece of scenery needs a lot of preparation work
Finally I have unboxed my Pigeon Loft Roof Shed. It really is rather large, and although allows for the fight to move inside, seems a little too large for my initial 7” x 9.5” rectangular roof-space. The resin casting also needs a lot of clean-up before it’s ready for painting, so for now I’ll be concentrating on some of the other scenery. Although I have already thought of expanding the game to having two or more rooftops to enable larger skirmishes. Such a layout will require models to leap from building to building (or fly), which will hopefully add an additional risk factor to the game.

Thursday 6 August 2015

"If You Value Your Life... Stand Aside And Interfere No longer..."

"I am the Silver Samurai... To attack me is death!"
This 28mm plastic “Wizkids” model of the Silver Samurai is miniature number 51 from the “Heroclix” Marvel Universe range and is based upon the one-time Daredevil adversary, Kenuichio Harada, as created by Steve Gerber and Bob Brown in July 1974. The miniature was initially undercoated with an old pot of “Citadel” Mithril Silver before I applied a heavy wash of Nuln Oil across the entire figure. I then dry-brushed the Japanese mutant with more Mithril Silver before picking out the sun disc emblem upon his chest with “Vallejo” Heavy Red and the “Citadel” glaze Bloodletter.
 Peter Cushion WIP - This elderly gent just needs a few grey hairs to be added
Having completed the former bodyguard of the Viper, I have made quite a bit of progress on my “Antediluvian Miniatures” adventurer, Peter Cushion. The elderly doctor simply needs his grey hair and tie painted and washed before he’ll be ready for varnishing and basing.

I have also managed to paint a few more areas on several other “Heroclix” miniatures I have littering my tabletop. I’ve now finished my Robotman’s red chest cables as well as the hero’s blue neuro-electric converter-amplifier and as a result I now just need to tidy up the automaton’s torso and pick out his eyes. In addition I’ve carefully painted up this very softly-sculpted figure of Two-Face, to the point where I really simply need to concentrate upon the disfigured hoodlum’s head before he too is finished.
Two-Face WIP - The model's incredibly thick pre-paint has meant his original two-tone tie is now plain blue
 Finally I have turned my attention back to the numerous “Horrorclix” models I once started painting towards the beginning of 2015 as part of a “Bureau for Paranormal Research and Defense” project. This "Indy Clix" miniature of Grigori Rasputin has already had his black gown’s chest emblem ‘picked out’ with blue and gold, so I have been building up the flesh undercoat on the mad monk’s bald head and arms. 

Monday 3 August 2015

'Gotham City High-Rise' - WIP - Part One

The Joker WIP - In game he'll be armed with twin jokerfish to slap in his opponent's face 
Every now and then I read a blog post which genuinely sends me into a creative frenzy of building, gluing and painting. One such article I’ve recently encountered is the marvellous “Pillow Fight At St. Trinian’s 02” battle report which can be found on Bryan’s incredibly popular website “Vampifan’s World Of The Undead”. This frantically fun AAR of “brutal pillow combat” appealed for several reasons. Most notably because the “Pillow A-Go-Go” rules were unbelievably brief and simple, a single ‘match’ could easily be played within the space of an hour and each player only actually needed to field three miniatures. In addition it seemed relatively easy to ‘translate’ the game’s mechanics over to a super-hero campaign I’ve had in mind for some time… the battle for control of Gotham City.

Obviously a pillow fight held upon a gigantic King-size bed between warring criminal factions wouldn’t actually look too out of place within an episode of Adam West’s “Batman” Sixties American television series; especially if the episode were to feature the Joker. But as I wanted this game to be a bit more serious in tone I’ve instead decided to base each ‘fight’ atop one of Gotham City’s high-rise buildings, and provide me with the opportunity to finally assemble some of “Ainsty Castings” terrific “Streetwise: Flatroof” resin scenery.
High-rise WIP - Having undercoated the rooftop's edging wall I now plan to work on some of the 'interior' pieces  
In addition I’ve decided to expand the size of the ‘arena’ from a 6” square bed to a somewhat larger 7” x 9.5” rectangular roof. Whilst this somewhat significant increase in ‘ground space’ may slightly skew the length of a game. It also allows me to populate the ‘battleground’ with some of the other “Ainsty Castings” products I’ve acquired over the years, such as junk piles, roof entrances, skylights, chimney stacks and even a pigeon shed. These obstacles could easily be utilised within a battle itself, such as causing combatants to automatically trip and fall, or ‘miss a turn’ as having been propelled through a doorway, they have to race back up the stairs they’ve tumbled down…

Replacing the rules’ different pillows (and subsequent bonuses and penalties) has also proved remarkably simple to reimagine by renaming the various cushions in favour of close combat weaponry. As a result rather than be armed with a standard feather pillow, a grim-faced villain will be carrying a crowbar. Whilst an especially mean bad guy would have his “Big Bolster” (which knocks back an opponent 2”) replaced with a bean bag shotgun.
Two-Face WIP - The still visible pre-paint job is so thick that I daren't undercoat this miniature
Perhaps the biggest change however, apart from swapping “scantily clad young women” for super-heroes and villains, is that once a model is knocked over the roof’s edge they are permanently out of the game (and probably plummeting to their death) unless they manage to fall on to a fire escape platform which will be dotted alongside parts of the high rise building. Then they’ll be able to ‘ankle grab’ opponents just as in the original rules.

Having built my (first) rooftop, and allowed for the center tiles to be removable so I can alter the layout from time to time, I’ve been basing and undercoating a number of “Heroclix” miniatures to use as gang leaders and members. Fortunately I’ve already painted a Commissioner Gordon and two Police officers in order to ‘field’ a team who can try and take back the streets of Gotham, as well as the Riddler and enough henchmen to populate the vast majority of criminal mobs. But harking back to my monthly plan to only paint miniatures currently on my table, I have also managed to undercoat a few of Batman’s more notorious gangsters, such as Black Mask, Penguin and Two Face. I have even started work on one of my many Jokers, as well as a “Horrorclix” Mime Monster and a Yama to use as his minions. 

Saturday 1 August 2015

"Let's Break Out The Grown-Up Toys."

"I died before. It was boring, so I stood up."
This 28mm plastic “Wizkids” model of Moon Knight is miniature number 26 from the “Heroclix” Marvel Critical Mass range and is based upon the street-level vigilante, Marc Spector, as created by Doug Moench and Don Perlin in August 1975. The miniature was initially undercoated with “Vallejo” White before I applied a heavy wash of Pale Grey over the entire figure. Once this transparent acrylic was dry, I then dry-brushed the ‘Fist of Khonshu’ with more White. The former-mercenary’s face mask is actually as equally as white as the rest of his costume. But as it’s predominantly coloured black in the comic books, as a result of the shadow the superhero’s cowl causes, I thought I’d replicate the effect by painting it with some “Citadel” Abaddon Black.

The schizophrenic crime-fighter’s nunchaku and crescent moon chest emblem were picked out using some “Citadel” Ironbreaker and Nuln Oil. In addition, in order to slightly break up the all-white monotony of the Moon God’s agent, I painted his throwing disc with Vallejo Gold before applying a wash of “The Army Painter” Strong Tone Quickshade to the weapon.
Robotman WIP - The superhero probably needs a third coat of "Vallejo" Heavy Red on his torso cabling
 Having found my painting ‘mojo’ temporarily disabled as a result of trying to recently paint some of the uninspiring “Guild Ball” miniatures by “Steamforged Games Ltd”, I’ve decided to spend August ‘clearing my decks’ and finishing off a number of past projects which have sat idly upon the edge of my worktable for the past few months. Unsurprisingly the vast majority of these figures are “Heroclix” superhero-based models, so to get things started I have finally managed to finish off the flesh highlights on my Silver Samurai and obtain a some nice deep red coverage on the Japanese flag emblem which dominates his shining chest armour.

I have also managed to start building up the “Vallejo” Heavy Red on the cables of my Robotman. I actually thought this leading member of “DC Comics” Doom Patrol would be a relatively straight forward figure to paint. But some of the sculpting of these cables is a little soft and hard to reach, especially under Clifford Steele’s arms.
Peter Cushion WIP - The elderly gentleman essentially just needs his flesh and grey hair to be completed
Finally I have been slowly progressing my adventurers by “Antediluvian Miniatures”. Professor Peter Cushion is rather close to completion in all honesty. Whilst Shug McClure shouldn’t be all that far behind him, now I’ve finished painting his dark brown trousers and ‘boxed off’ most of the explorer’s details with “Citadel” Abaddon Black.