Saturday, 20 June 2015

"Guild Ball" - WIP - Part Four

Blackheart WIP - Having washed the pirate's armour and gold, I've just to ink his blade
As I now plan on posting a few game reports once I’ve got enough models painted for two three-player teams, I’ve spent a bit more time concentrating on the three Guild Ballers I used for last weekend’s matches. In particular I’ve been working away at my Union captain and central midfielder Blackheart.

To be honest I actually wasn’t all that terribly impressed with the pirate king’s performance on the pitch. But as you have to always field him as club skipper and he does generate four influence per turn, as opposed to Fangtooth and Rage’s one point apiece, then I did start to slowly warm to him towards the end of my second match. Indeed Blackheart’s whopping ability to use (and thus potentially attack) six times per turn finally started to wear his opponents down. Even if his playbook (which dictates the damage he inflicts) is a little soft unless you manage to score a hit with five or more of his six attack dice.
Fangtooth WIP - The centre back's trousers just need their stitching to be picked out and washed to be finished
Having said that the midfielder’s character trait of “Shadow Like” does give him a free two inch move at the start of his activation and his double-handed sword means he has a melee zone of two inches as well… something which is very useful when attacking rival players with a shorter attack range.

I’ve also been slowly progressing Fangtooth, and having inked his feet and highlighted his toes, I have been working my way up his corpulent frame. I’ve now finished painting his pants, and started work painting the lengthy rusty chain he uses as a belt.
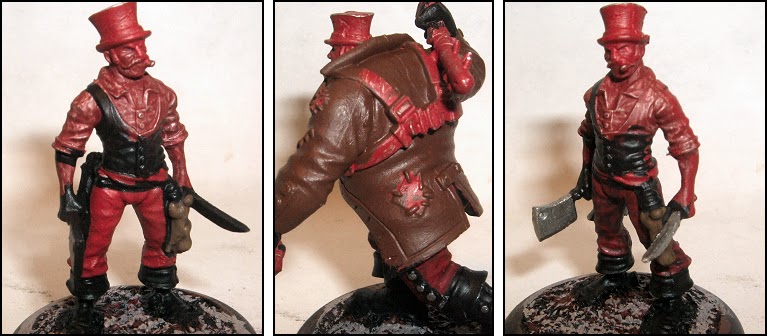
Rage & Avarisse WIPs - Once his blades have been washed Rage's black waistcoat will be painted
 In addition I have managed to complete Rage’s red trousers, wash them with brown ink and start picking out the attacking midfielder’s ‘infamous’ meat cleavers and carving knife. I plan on giving these kitchen utensils, along with his white waist band a spattering of blood if I can.

Finally I have even found the time to begin painting Avarisse’s large brown leather coat. The brute's outer garment is absolutely covered in patches, off-puttingly so to be honest, so I plan on practicing painting such stitching on Fangtooth first.  

Tuesday, 16 June 2015

"Guild Ball" - WIP - Part Three

Rage WIP - Boots and slaughtered rabbit on hip have been finished. Just working on his red trousers
Having played a couple of matches of “Guild Ball” by “Steamforged Games Ltd” over the weekend I’ve found my enthusiasm for the game’s wonderful, but rather expensive, miniatures at an all-time high. Indeed I’ve subsequently ordered not only another Union player to fill out my squad so I can field a full Captain and four players, plus mascot. But I’ve bought the makings of a second opposing team in the shape of the Engineer’s Guild and a load of plastic templates and tokens.

As far as my painting table is concerned however I’ve been concentrating on my Union team’s attacking midfielder Rage; a character who has more than a passing resemblance to that of William “Bill the Butcher” Cutting, as portrayed by Daniel Day-Lewis in the 2002 motion picture “Gangs Of New York”.
Avarisse WIP - Boots and trousers have been completed. Brown trench coat is next
Rage is undoubtedly the star of my squad and proved invaluable when I snatched victory from the jaws of defeat in my second match. In a game where models require ‘Influence’ in order to be activated, run and fight, his ‘Furious’ ability allows him to very usefully charge (enter close combat with an improved attack) for free. Coupled with his ‘Bezerk’ power (gains a free attack when he damages an opponent) and this cigar-chomping killer can very quickly do some serious damage. In addition any successful attacks Rage makes also cause bleeding as a result of him always slicing a ‘Crucial Artery’.

I’ve also been slowly painting away at my incredibly large, and annoyingly cumbersome model of Avarisse. His magnetised chest loop is essentially finished, and I have finally managed to complete work on his trousers and leg studs – though the latter still need to be washed with “Citadel” Nuln Oil.
Coin WIP - The fat snake has been washed and dry-brushed. Just need to pick out his eyes and flock the base
Finally I’ve almost completed Coin, my team’s animal mascot. This model has actually proved incredibly difficult to ‘stick with’ as for some reason the edges of the snake’s scales don’t seem to like having paint on them. As a result the rather large python has had at least four green undercoats, been washed and dry-brushed repeatedly and still tends to ‘flake’ or ‘chip’ if even slightly handled. I’m therefore rather keen to finish this mascot and get him varnished, flocked and done… 

Saturday, 13 June 2015

Zombicide Report: Batman & Commissioner Gordon Verses Werewolves

BATMAN AND JIM GORDON BATTLE WEREWOLVES
This game was played using the ‘Season One’ rules of “Zombicide” by “Guillotine Games” and as we were attempting the mission C19 “A Little Setback” we used the Tiles 5B, 6B and 7B. Because I wanted to try out the rules playing with superheroes, and have plenty of painted “Heroclix” and “SLAP Miniatures” ready for the table, we simply swapped the Survivors, Walkers, Runners and Fatties with some of my previously finished models…

“The story so far… The super-villain Hyena has sworn to murder Commissioner Jim Gordon before he can collect a file of evidence from a nearby G.C.P.D. evidence store and bring her to justice.  Having set out to collect the file, the Police officer has had to flee to a local restaurant as the streets are full of Hyena’s were-minions looking to claim the bounty on his head. As a result Gordon has locked himself inside the diner’s bathroom, knowing full well that the fangs of his foes are right outside. Hearing of his long-term friend’s predicament over the police radio, the Dark Knight has arrived on foot nearby. But there’s both werewolves and buildings between him and his fellow crimefighter, and then the duo will still need to collect the court file from the evidence locker…”
THE TABLETOP - THE STREETS OF GOTHAM CITY
Before we started we changed a couple of the printed scenario’s special rules in order to make it a bit different. Instead of following the “Split without enough weapons” instructions we gave Commissioner Gordon a pistol and a crowbar, whilst Batman was awarded a pistol and was allowed a free search action. In addition we ignored “It’s quiet for the moment” and used all of the Zombie cards from the ‘Season One’ boxed set.
BATMAN RACES TO THE RESCUE OF COMMISSIONER JIM GORDON
The game started with Batman moving north up the street so he had sight of the entire length of Alucard Avenue. This was a sound plan as the Dark Knight suddenly found himself outflanked by a grey lycanthrope (runner) to his west and a brown-furred fiend to his east. Jim Gordon meanwhile found another crowbar in the rest room, and decided to sit tight and simply listen to the howls of the three werewolves just outside.
THE DARK KNIGHT FACES THE WEREWOLVES OF THE HYENA
Realising the faster of the two fanged-frights was the biggest threat, the Caped Crusader fired two slugs into the beast. His cowl eye-slots narrowed as his shots flew wide, and Batman moved back south to put some space between himself and his fast-moving target. Gordon continued searching for anything useful in the restaurant’s bathroom and to his astonishment found a hunting rifle tucked away in one corner. Meanwhile the grey werewolf had leapt into contact with the Dark Knight, just as more fearsome howls were heard coming from Alucard Avenue.
BATMAN FENDS OFF THE FANGS AND CLAWS OF KILLER LYCANTHROPES
Batman finally managed to fell his furry foe and also ‘killed’ the brown werewolf at the north end of the street. Hearing the sounds of a nearby battle, Jim decided it was time to fight for his freedom and wrenched open the bathroom door. His rifle fired twice, and two of the werewolves waiting for him outside crumpled to the floor. Although the third one was upon him in an instant…
GOTHAM CITY'S FINEST DISPATCH THE HYENA'S FURRY FIENDS
The Dark Knight managed to shoot another werewolf to his north, and moved up into Alucard Avenue. Meanwhile the G.C.P.D. detective thwacked his foe about his furry head twice with a crowbar, and made to leave the restaurant. Up ahead Jim could hear more howls as more lycanthropes appeared in Alucard Avenue.
BATMAN FIGHTS ON AS JIM GORDON ESCAPES THE RESTAURANT
Commissioner Gordon had a last look around the diner, picked up ‘plenty of ammo’ and then moved north into Alucard Avenue. Just in sight the policeman could see Batman slaying the werewolf which was coming at him from the west and then miss the furry fright which had appeared between them. Sensing he was about to be overrun, a frustrated Batman slipped back south again. A good move as even more werewolves arrived.
RUSHING TO HIS FRIEND'S RESCUE, GORDON SPOTS LOADS OF WEREWOLVES
Eager to clear his cowled friend a pathway to his side, Gordon fired his rifle and ‘killed’ two of the newly arrived lycanthropes. Now it was just down to Batman to fight his way north but the Caped Crusader was having a bad day, and failed to fell any of his foes. One of the beasts closed with him, whilst the Dark knight spotted even more appearing at the north end of the street. Sensing blood the Hyena herself then suddenly appeared to the northeast, accompanied by two slavering were-wolves.
THE HYENA MAKES AN APPEARANCE HERSELF, FLANKED BY MORE WEREWOLVES
Gordon continued to try and clear Alucard Avenue so the vigilante crimefighter could reach him. But the policeman was only able to floor one of the werewolves who had just arrived in the street. Batman meanwhile managed to fend off the two lycanthropes who were encircling him. But another hairy horror replaced them and the Hyena was getting rather close. Gordon tried to yell out some encouragement to the Caped Crusader but the shout died in his throat as two more brown werewolves appeared before him.
COMMISSIONER GORDON AND THE DARK KNIGHT CONTINUE TO BATTLE
Firing his rifle the Police Commissioner had to retreat south when his shots missed. He was being pushed back to the restaurant. Batman was having problems of his own as all three of his attacks upon his furry foe missed, and he was wounded. Worse, the Hyena and her two fanged companions joined in the fight. He was going down next turn…
BATMAN IS WOUNDED AND ENCIRCLED AS JIM GORDON FLEES
Batman managed to fell one of his assailants, and as a result gained an additional action, which he used for a fourth and final attack. The Caped Crusader was going to take as many of his opponents down with him. Unfortunately this shot also missed and the Hyena was upon him, teeth biting and claws rending… Realising his ‘saviour’ was no more Commissioner Gordon pondered whether to ‘go it alone’ for the court file. But any resistance left him when he heard the distant approach of Chemo…
THE END OF THE CAPED CRUSADER AS THE HUGE VILLAIN CHEMO APPEARS
 Disappointingly G.C.P.D. had failed to bring the evil Hyena to justice and make the were-creature pay for her many crimes. But Commissioner Gordon had managed to escape alive and well and would soon be ready to fight another day, alongside a new incarnation of the Dark Knight...

Wednesday, 10 June 2015

"It's Not Wise To Upset A Wookie."

"Laugh it up, Fuzzball."
This 28mm plastic model of Chewbacca is made by “Wizards Of The Coast” and is actually model number 23 Wookie Freedom Fighter from the Alliance and Empire expansion from the manufacturer’s Star Wars Miniatures Game.

In order to ‘cover-up’ the miniature’s somewhat light brown pre-paint colour scheme I initially undercoated the entire figure with a couple of layers of “Vallejo” Charred Brown before washing the wookie with “The Army Painter” Strong Tone Quickshade. I then repeatedly dry-brushed the model using “Vallejo” Charred Brown, and then some Heavy Sienna, with an old “Royal & Langnickel” round brush in order to try and bring out the co-pilot’s hairy detail.
Chewbacca WIPs - "Citadel" Dark Flesh and Ironbreaker were used on the ammunition belt
As I wanted to replicate some of the smuggler’s darker fur patches I dabbed parts of the figure’s legs, feet, chest and arms with “Citadel” Nuln Oil and once that had dried, gave the areas another dry-brush of “Vallejo” Heavy Sienna. I painted the wookie’s ammunition belt with “Citadel” Dark Flesh and used some “Vallejo” Heavy Brown for his pouches. I then applied some more Strong Tone Quickshade by “The Army Painter” over both of these areas. Finally I picked out all the rebel’s belt buckles and ammo clips with the “Citadel” Layer Ironbreaker before giving them a wash of Badab Black.
Re-basing The Undead - "Copplestone Castings" Future Wars Code FW4 Plague Zombies
Having played several games of “Guillotine Games” outstanding board game “Zombicide” recently I have been sorely tempted to start painting the seemingly endless plastic undead figures from its boxed set. But having trawled through some dusty old boxes of miniatures I painted aeons ago, I have instead decided, for now at least, to simply re-base a number of these zombies made by “Copplestone Castings”.

Indeed having rooted around in my lead pile I have found that I have quite a few more yet to paint, so once I have finished removing these metal miniatures from their ‘old’ two penny pieces I’ll still be able to add to their number if need be.

Monday, 8 June 2015

"Guild Ball" - WIP - Part Two

Avarisse & Greede WIPs - The magnets have now all been super-glued in place
Over the past few days I have been persevering with my Guild Ball miniatures by “Steamforged Games Ltd”. My main problem has been gluing together the unbelievably delicate (second) miniature of Greede, which now finished can be physically carried by his team-mate Avarisse using a couple of magnets. I actually thought the 'stand-a-lone' striker which comes with the Union Starter Set was difficult enough to put together. But this 'hooked' version comes in a staggering four pieces despite its diminutive size, and as a result his protruding legs have been well and truly grey-stuffed and super-glued in place.

Having attached a micro magnet to the back of Avarisse's chest loop, I have also started to finally place some paint on this overly large private Entrepreneur for Hire. For now I've simply finished with his black boots, and even picked out his footwear's studs with some metal. I was originally going to paint this area brown but seeing as I plan to use that colour for the burly bruiser's large coat I thought I'd go for the far simply paint scheme. At some point though I will give the battered and broken shoes a quick dry-brush of "Vallejo" Heavy Charcoal in order to try and bring out some of the sculpt's detail.  
Fangtooth & Rage WIPs - Both models are still in their early stages of painting
I have also managed to get some of the groundwork done on my Fangtooth miniature, and undercoated his waist chains and blades in preparation for painting them with "Vallejo" Gunmetal Grey. In addition I have applied some Heavy Skintone to the centre back's feet and now simply need to tidy up his basing colours before I can wash both his flesh and his stand's muddy earth.

Now the super-glue to both of Rage's arms has dried, I have not only given the attacking midfielder an undercoat of red. But have applied a second layer of Heavy Red to his trousers. This should allow me to quite simply paint his boots black and start picking out the dead rabbits and meat cleavers which are tied to his waist.   
Blackheart & Greede WIPs - An initial layer of metal has helped highlight the captain's armoured areas
The Blackheart miniature strikes me as being possibly the hardest of my Guild Ball models to paint, as the captain's pose is so very dynamic. As a result I don't plan to employ my usual technique of painting a figure 'feet-first' with him, and instead plan to paint his deeper harder to reach areas, such as some of his stomach bracing and cloak's embellishments, first. Having said that I wanted to get his armoured areas out of the way, so have initially undercoated them with "Citadel" Abaddon Black before applying a rough layer of "Vallejo" Gunmetal Grey.

Thursday, 4 June 2015

"Guild Ball" - WIP - Part One

Avarisse & Greede WIPs - A second version of Greede can be attached to Avarisse's belly magnet
This assortment of Guild Ball miniatures by “Steamforged Games Ltd” were something of an impulse purchase just after Salute 2015. Indeed up until this point I had absolutely no intention of playing the “mob football” game. But there was something about the Union Starter Set and its accompanying blisters featuring Fangtooth and Rage which I thought I could do something with…

Many of these metal models are though a little too fiddly for my liking, especially the diminutive Greede whose miniscule separate arms and legs proved extremely troublesome to attach onto his torso. I’m not sure what makes a manufacturer think the tiniest of nodules on the end of a thin limb will be sufficient to create a solid bond because they simply don’t in my experience.
Fangtooth & Blackheart WIPs - The fat fiend is a single casting, whilst his captain comes in four pieces
In the end, as many of the joins were too small to drill, I’ve used a lot of superglue and grey-stuff in order to try and ensure as much of each limb as possible is in contact with the figure’s main body. Rage’s hands are a good example of this, where I’ve tilted them slightly in order to ensure that his weapons are also touching (and thus glued) to his thighs. Once dry he’ll now need some additional grey-stuff to fill in the gaps but he should be a far sturdier model when finished.

The ‘official’ colour scheme of this “mismatched bunch o’ mercenaries, scum and criminals” is predominantly red and purple. But though I plan to stick to using plenty of dark red, I plan to forgo the purple for black and browns. I’ve also gone with green instead of purple for the colour of the team’s mascot, the “horrific serpent” Coin.
Rage & Coin WIPs - Just waiting for the glue and grey-stuff to dry
 So far I’ve only managed to give most of the models an initial undercoat of “Vallejo” Heavy Red already, to start bringing out each sculpts’ detail. But as I have a game planned for next week (and I only like to play with painted models) I hope to progress at least the captain, Blackheart the Pirate King, Fangtooth and one other within the next few days.

Tuesday, 2 June 2015

Painting Challenge 2015: Fortnight Five - 2mm Land Ironclads By “Brigade Models”

Great British WIPs - All the ironclads have been undercoated brown ready for washing with brown ink
This fortnight’s personal painting challenge is another simple one in that all I have to do is paint something from my 2mm, or to be more precise 1/1200th collection of models.

Many years ago I actually painted up a small Great British Fleet from the "Aeronef" range of flying steampunk ships made by "Brigade Games". As a result I was sorely tempted to just paint up the German Fleet which accompanied my British cruisers in the company's British Verses German Starter Pack. But as I scrambled around looking for them I discovered I'd subsequently bought a load of models from the Kent-based manufacturer's Land Ironclads range as well.
More Ironclad WIPs - The German Army will be painted with a light grey colour scheme
Many of these '"huge fighting machines" had already been based and undercoated. But there was still some work to be done to get them prepared for the painting table, such as flocking their bases with sand and grit. In addition the "Citadel" Dark Flesh and Devlan Mud combination I'd originally painted the Great British Army in was long since out of production. So I have repainted all of these ironclads with a "Vallejo" equivalent.

The German Army's three-car land train had clearly taken a bit of a knock whilst in storage and lost one of its masts. To be honest I wasn't actually bothered by this as these delicate details look out of place upon such formidable engines of destruction. I've therefore simply grey-stuffed over the hole and will file it down smooth once it has dried, ready for its undercoat.
PzLdZg Gustavus WIP - The land train's engine car has had its mast removed, whilst the infantry car's one remains
For now I plan to just simply dry-brush these vehicles with their base colour and then pick out their machine guns and cannons with silver. I won't be highlighting their decking or painting in minute details such as their company insignias. I might though, if things go smoothly enough, order some more of the bigger battalion sets, and perhaps a few dozen stands of 2mm infantry...