Showing posts with label AAR. Show all posts

Wednesday, 21 May 2025

"You Are Under Arrest, British Scum!"

 "Come out from hiding!"

This 28mm metal model is produced by "Athena Miniatures" as part of their Apocalypse Survivors range, and comes from the company's AS12 Russian NBC four-figure set. I've been working on a dozen of these sculpts since stumbling across them whilst at "Warfare" 2024, and with this final figure now finished intend to use them for some classic "Invasion!" skirmishes set during the classic comic book strip created by Pat Mills for "2000 A.D." in the late Seventies.

The Soviet Radiological, Chemical and Biological Defence trooper was initially undercoated using a couple of layers of “Vallejo” German Fieldgrey WWII, and shaded in "Citadel" Nuln Oil. He was then dry-brushed with (more) “Vallejo” German Fieldgrey WWII so as to bring out all the folds/creases in his rubber suit, and subsequently had his buttons 'picked out' with a combination of "Vallejo" Heavy Sienna and "Citadel" Agrax Earthshade.

The Russians and British square of against one another whilst investigating some grisly murders

This fairly simple palette meant that the miniature was predominantly finished quite quickly. However, I thought the model looked a tad plain, so decided to break its overall look up a bit by using a smidgeon of "Vallejo" Neutral Grey and "Citadel" Nuln Oil on both the Russian's gloves and over-boots. I also thought the soldier would look more menacing if I painstakingly applied some "Vallejo" Gunmetal and "Citadel" Nuln Oil to his firearm and eye lenses. As a final touch then trooper's respirator and rifle butt was given a lick of "Vallejo" Heavy Sienna and a splash of "Citadel" Agrax Earthshade.

In addition to my painting, I have also managed to play another game of "The Silver Bayonet" by "Osprey Games". This time round we decided to have a straightforward shootout between a force of British adventurers and my Russians, so chose to use the rule-set's opening scenario - The Investigation. However, rather than have a Hobgoblin suddenly appear during the battle, we decided to have a (Straw) Troll emerge instead.

The Russians bravely look for clues whilst being peppered by the British infantrymen

Things definitely got off with a better bang for the British as their 95th Riflemen managed to successfully pepper the Russian infantrymen. The sharpshooters' more accurate rifles clearly gave them a distinct advantage over their musket-wielding opponents, and began racking up hit after hit. Disappointingly, a good deal of the recruitment costs spent by Tsar Alexander I's officer had been foolishly placed at the feet of a peasant who claimed he could transform into a formidable Were-bear.

Once the (Straw) Troll appears the British quickly ask the Russians for a ceasefire

But after a few rounds, during which the Moscow Militia came under increasing fire, there wasn't a sign of the huge hairy animal anywhere to be found. Instead, the Russian's brave leader uncovered the aforementioned large (Straw) Troll which had been slaughtering the locals, and quickly agreed with Major Sharpe of the British contingent to combine their forces to confront the brute. This team-work seemed to be a splendid idea, and before long the monster terrorising the English line was taken down.

Wednesday, 14 May 2025

"My Mommy Always Said There Were No Monsters."

"No real ones. But there are."

These 10mm scale metal Xenomorphs are produced by “Pendraken Miniatures” as code SFC2 Medium Creature Type 2 from their Alien Creatures range, and come in a pack of five single-pose sculpts. Intriguing however, the sculpts are probably closer to 15mm scale (from head to tail-tip), so surprisingly sit down on the tabletop with my old collection of aliens by "Ground Zero Games" rather nicely.

I also thought these deadly extra-terrestrials would fit in rather nicely with the Monster May(hem) Challenge currently being held over on the "Dead Dick's Tavern and Temporary Lodging" blog, as its rules specifically state that the entries needn't be limited to fantasy-based beasties. And frankly, I think there's only a few people who wouldn't think of H.R. Giger's creature from the 1979 film "Alien", if they were asked to name the most famous science-fiction monster of all time.

The models themselves were pretty simple to pigment, largely thanks to a double coat of "Citadel" Abaddon Black doing most of the work. The miniatures were then dry-brushed with "Vallejo" Heavy Bluegrey, drowned in "Citadel" Nuln Oil, and later had their domed-heads touched up with a little (more) Abaddon Black, so as to make them slightly stand out from the rest of their horrifying horde. 

The Russians and British approach a revenant infested ruined chapel

Alongside my painting, I have also managed to play another game of "The Silver Bayonet" by "Osprey Games". Having previously tackled a couple of the rule-book's PvP (Player verses Player) Scenarios, this time around we thought we'd try a co-operative game of "The Ruined Chapel", and set up a disconcertingly small 30" x 30" board accordingly. In addition, I dug through my collection of scenery and placed a ruin, six gravestones, four clue markers, half a dozen (straw bear) Revenants and plenty of trees as the set-up instructions directed.

As I wanted to use some of my Russians by "Wargames Foundry" for this battle, I selected a sword-wielding Officer, a pair of (recently pigmented) Moscow Militiamen as Irregulars and a lone Infantryman. Whilst my ally went with an assortment of British soldiers from so many different manufacturers as to almost set off my OCD (Obsessive-compulsive disorder). Fortunately, they were being led by a certain Major Richard Sharpe, so I had high hopes that the quartet would at least do a sterling job on the tabletop, even if their different physical sizes was rather jarring to me.

Just as soon as a Vampire appears the British flee from their position

Sadly, things went wrong straight from the start as my Officer bravely marched up to the closest Revenant emerging from behind its gravestone, and was savaged to death. To make matters worse, my British compatriots - having deployed in a corner opposite my own forces - realised that they were too close to one another and couldn't manoeuvre as they had hoped. This caused Wellington's men to waste some actions rejigging their respective positions, and set them up perfectly for the Vampire which appeared right behind them at the end of Turn One.

Disappointingly, things did not get any better for Major Sharpe's contingent in the subsequent fighting, as his soldiers failed to cause any damage whatsoever to the deadly blood-drinker in their midst. Admittedly, some musket fire did start to take its toil upon a pair of Revenants that were closing in upon them from the ruin. But both Richard and his fellow Rifleman took some significant damage themselves in return. Indeed, it eventually became clear that the surviving members of the group needed to head south away from the Vampire as fast as their mud-splattered boots would allow them.

***** 'Bravely ran away, away! When danger reared its ugly head, He bravely turned his tail and fled. Yes, brave Major Sharpe turned about. And gallantly he chickened out. Bravely taking to his feet. He beat a very brave retreat, Bravest of the brave, Major Sharpe!' *****

The brave Russians attempt to hold line against the Undead, as the British flee for their lives

Happily however, despite losing my Officer early on, the rest of my plucky Russians got busy bagging plenty of Revenants with their withering gun-fire. This eventually allowed my Infantryman to head into the ruin unmolested, and discover a bag of Silver Shot for his musket. In addition, the top fellow then uncovered a Small Icon, which would soon be needed to save him from the foul jaws of a Revenant.

Outside, an already dire situation was worsening for the remaining British, as a second Vampire emerged from the surrounding woodland to join his fellow Nosferatu in stalking Major Sharpe. Setting up a firing line along the southern-most edge of the map, both forces combined their musketry in a last ditch effort to keep the Undead horde approaching them at bay. This did momentarily appear to be working as one of the blood-drinkers was finally wounded. But in the end Richard and my Russian in the ruin fell, and this caused the rest of our fighters to understandably retreat back into the forest...

Monday, 25 November 2024

"The People Playing The Bears..."

"...Either dress in costumes made of straw, or are actually wrapped in straw."
These 28mm scale metal models of four Strawbears are produced by “Crooked Dice Game Design Studio” and can be bought as SKU: MINI 466 from their Children of the Fields range. The single-cast pieces can also be purchased as part of the Lincolnshire-based company's four-figure Mummer Procession deal, along with a Hobby Horse, Accordionist and Drummer.

The highly-detailed sculpt actually came about as part of the manufacturer's successful "Children of the Fields - Folk Horror 28mm Miniatures" Kickstarter in May 2018, and was unlocked as the campaign's £22,000 stretch goal. However, I picked this particular quartet up as part of a larger pre-order directly from company owner Karl Perrotton when I recently visited his stall at "Warfare" 2024 - as I want to field a considerable number of the Strohbären as 'generic' Revenants for "The Silver Bayonet" by "Osprey Games".

"Black Site Studios" WIPs - Three primed NASA Astronauts ready for some shading
All of the miniatures were primed using a couple of coats of “Vallejo” Dark Yellow and liberally drenched in “Citadel” Agrax Earthshade. Each figure was then heavily dry-brushed with (more) “Vallejo” Dark Yellow, and then Buff, using a large, soft-bristled make-up brush. I next decided to break up their palette a little bit more by sporadically applying splotches of “Citadel” Reikland Fleshshade and Biel-Tan Green to certain areas of each model, and ultimately blended all these colours together with a second dry-brush of (more) “Vallejo” Buff.

With half of my Strawbear reinforcements finished, I've made a bit more progress on my squad of NASA astronauts from the "Lunar" range by "Black Site Miniatures". This five-model force has actually been assembled with a homebrew version of "The Silver Bayonet" in mind, and should prove fairly straightforward to get tabletop ready on account of their predominantly "Two Thin Coats" "Celestial Blue" palette - albeit I do plan to apply a little "Vallejo" Heavy Blue to certain areas just to break the colour scheme up a little bit.

Undead Egyptian Mummies attack both the British and French forces searching for treasure

I have also managed to play a second adventure for my ongoing "The Silver Bayonet" campaign featuring my British (Coalition) warband. Once again sticking to the recommended 3x3 foot table size - as opposed to the significantly larger cloth mat we've previously been playing on - my forces attempted to both discover and then capture "a powerful artefact" during scenario "The Revenants". As before, this confrontation was fought over an Egyptian-flavoured battlefield, where a tomb packed full of undead Mummies (which looked rather suspiciously like the Osiran Sutekh's service robots) rather inconveniently disgorged its protectors upon my alliance of Green Jackets and Russian infantrymen.

To make matters worse, my opponent's competing French force was lead by none other than General Thomas-Alexandre Dumas Davy de la Pailleterie himself - who rather disconcertingly lived up to his fearful reputation by repeatedly surviving sword-fight after sword-fight with my Junior Officer throughout the encounter. Ultimately, Napoleon's fiendish Frenchmen found and then fearfully fled the desert sands with the valuable curiosity intact, despite a desperate attempt by Russian fusiliers to chase them down before they could escape...

Thursday, 21 November 2024

"The Soviet Union Was Able To Pull Ahead..."

"...And claim a major victory by landing on the Lunar surface."

This 32mm resin Russian Astronaut is produced by "Black Site Studios", and forms part of the Lunar Core Game pre-order I made with the American-based manufacturer way back in July 2021. These days the figures are available as either part of the five-figure set SKU: LNR6805BSS - Soviet Cosmonauts, or the manufacturer's current Two-Player Starter Box, and was rather patiently assembled from an almost overwhelming number of tiny pieces which came inside the starter box.

To begin with the rocketeer was super-glued to a "Citadel" 30mm circular stand, as opposed to one of the bases which came with the kit, and then armed with a whopping great ceramic tiled panel and a brain-bustin' monkey wrench. The fearsome spaceman was then undercoated with plenty of "Two Thin Coats" Sanguine Scarlet, drenched in "Citadel" Carroburg Crimson, and dry-brushed with (more) "Two Thin Coats" Sanguine Scarlet.

"Black Site Studios" WIPs - Three primed NASA Astronauts ready for some shading

As I wanted the Cosmonaut's equipment/weaponry to stand-out from his suit, and felt that the coated LI-900 silica ceramics would be light coloured, I decided to pigment the model's shield using a combination of "Two Thin Coats" White Star and plenty of watered-down "Citadel" Agrax Earthshade. The panel's rim and interior was later treated to some "Vallejo" Gunmetal, "Citadel" Nuln Oil, and a dry-brush of (more) "Vallejo" Gunmetal. Lastly, I picked out some of the stray wires protruding from the piece with either "Vallejo" Heavy Blue and "Citadel" Drakenhof Nightshade, or "Vallejo" Escorpena Green and "Citadel" Biel-Tan Green.

The miniature's face-plate was carefully painted using some "Vallejo" Gold over a Heavy Sienna basecoat, and subsequently shaded with a little "Citadel" Agrax Earthshade. Whilst it's large wrench was given a lick of "Scale 75" Decayed Metal, washed with "Citadel" Agrax Earthshade, and given a dry-brush of (more) "Scale 75" Decayed Metal.

The French win a narrow victory in "The Silver Bayonet" by killing a homicidal Hobgoblin

Alongside finishing off my Soviet Cosmonauts, as well as starting my NASA astronaut squad, I have started a campaign playing Joseph A. McCullough's "The Silver Bayonet" ruleset by "Osprey Games" using a selection of my Napoleonic miniatures. We've gone right back to the first of the scenarios to begin such an adventure, and stuck to the recommended 3x3 foot table too - as opposed to the significantly larger cloth mat we had been playing on. Having fought "The Investigation" a few times, I also thought it might help mix things up a bit if the two opposing forces fought over an Egyptian-themed field, rather than a European one.

Perhaps the biggest impact for my (up to this point) unbeaten British (Coalition) party was how much more quickly the French came within musket range of my green-jacketed Riflemen. Admittedly, my forgetting to use their +2 Accuracy bonus didn't help either. But compared to our previous encounters, it wasn't very long before Napoleon's men were peppering my elite sharpshooters with plenty of withering fire. Needless to say, I never properly recovered from this increasingly frantic exchange of lead balls, and narrowly lost the scenario by a single Victory Point when the French surprisingly cut down the vindictive Hobgoblin who had been slaughtering nearby settlers...

Monday, 11 November 2024

"On July 9, 1810..."

"...After the Kingdom of Holland was annexed by the French Empire..."

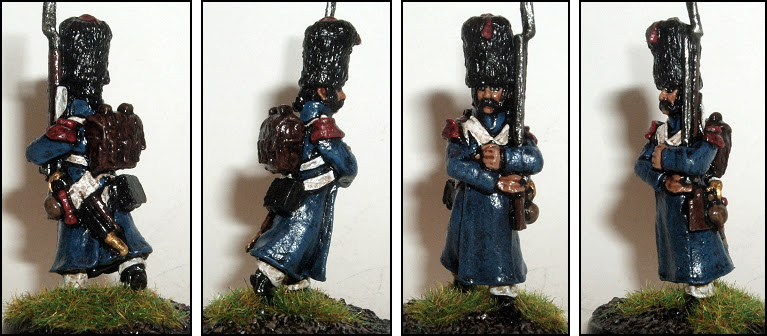
These two 28mm scale metal models are sold by “Wargames Foundry", and can be purchased as part of their identical eight-figure blister FN175 - Imperial Guard Dutch Grenadiers In Greatcoat Marching. The company's Napoleonic French range was sculpted by Michael and Alan Perry, and I was lucky enough to pick this set up in person when I visited the manufacturer's premises in Newark, late last year.

"Initially numbered the 2nd Foot Grenadiers Regiment of the Imperial Guard", the pair were initially primed using my usual mixture of "Citadel" Abaddon Black and Vallejo Surface Primer Black, before their trousers and various leather straps were layered with "Two Thin Coats" White Star, and 'weathered' with some heavily watered-down "Citadel" Agrax Earthshade. I then applied some "Vallejo" Heavy Blue and "Citadel" Drakenhof Nightshade to each miniature's great-coat, as well as 'picked out' all the details around their waists - such as drinking bottles, swords and ammunition pouches.

"...The Dutch Grenadiers were incorporated into the French Imperial Guard."

To be honest when I had first selected this particular blister off of the showroom's rack I hadn't spotted half the equipment attached to each soldier's rear, so was originally a little despondent when I later saw just how much stuff each Frenchmen carried. However, despite having decided early on with this painting project that I wasn't going to go mad with buttons, small straps and cuff /collar braiding, I did feel elements such as the tassel tied around on the sword-hilt were worthy of some time, so gave them a lick of "Two Thin Coats" Sanguine Scarlet and "Citadel" Carroburg Crimson. Furthermore I applied "Vallejo" Heavy Red and "Citadel" Carroburg Crimson onto the two models' epaulettes, bearskin tassels and grenadier emblems.

One of the big motivators behind my current passion for all things Napoleonic is undoubtedly Joseph A. McCullough's "The Silver Bayonet" ruleset by "Osprey Games", and recently I was able to play a couple of the game's opening scenarios - pitching my British (Coalition) warband against a fiendish French raiding party. Littered with various buildings, a spot of marshland and a river running into a pond, the tabletop was somewhat larger than the 3x3 foot one recommended in the book. However, it gave us plenty of room for manoeuvring and exchanging musket balls across the village/town before each side closed upon the clue markers.

The British Officer leaves with the artefact whilst the French continue fighting Straw Bears

The first conflict was based upon the scenario "The Investigation", and was frankly a bit of a one-sided affair as the murderous Hobgoblin killing the locals was soon revealed by my forces, and then shot to pieces by a pair of British Green Jackets using their famous rifles. This caused us to quickly slap a disused barn into the centre of the battlefield so we could give "The Revenants" a try instead, and this battle against a horde of animated Strawbears (by "Crooked Dice Game Design Studio" was much closer.

Indeed, there was some ferocious firefights between the Russian Infantrymen I fielded and some of the French side's more colourful characters - such as the Occultist, who successfully twice cursed one of my fusiliers during the skirmish. On the other side of the battle, my Riflemen were outnumbered by muskets and became locked in a truly deadly battle of attrition, with lead balls flying all over the place. In the end though, my Officer was able to snatch the missing artefact and bring it safely back behind the British line, whilst my opponent's Commander, Doctor and Sapper were still busy fending off the straw-based revenants around the village pond... 

Sunday, 18 February 2024

"From Out Of The Marsh Bursts The Gnashing Jaws..."

"...And whipping tentacles of a terrifying Marsh Beast."

This 28mm scale resin model of a Marsh Beast is produced by "Crooked Dice Game Design Studio" and can be brought as SKU: MINI 1297. Sculpted by George Fairlamb, and heavily influenced by the Arborian Swamp Creature briefly depicted in Mike Hodges' 1980 science-fiction movie "Flash Gordon", this multi-piece miniature has been sat in my 'Pyramid of Possibilities' since I first received it way back in 2022, following the Lincolnshire-based company's successful Pirates of Luna City Kickstarter.

Ultimately shot by Prince Barin with a laser pistol, the monster had all its sharp-tipped tentacles super-glued into position, before being treated to an undercoat of "Vallejo" Surface Primer Black and Heavy Green. The ensemble was also given a lick of pure "Vallejo" Heavy Green, shaded with plenty of "Citadel" Nuln Oil and Biel-Tan Green, as well as dry-brushed with (more) "Vallejo" Heavy Green.

"Crooked Dice Game Design Studio" WIPs - These four Uranian Guards are being painted from the feet up

I then 'picked out' all of the Marsh Beast's cruel-looking spikes using a combination of "Vallejo" Charred Brown and "Citadel" Agrax Earthshade, and momentarily considered dry-brushing their very ends with an additional touch of "Vallejo" Charred Brown. However, in the end I left well enough alone, and instead just darkened down both its gaping maw and some moss-covered patches on its body with (more) "Citadel" Agrax Earthshade. These areas were later treated to a careful dry-brush of "Vallejo" Heavy Green to help somewhat blend them in with the surrounding blubbery mass.

With the first of my post-Analogue Hobbies Painting Challenge (AHPC) projects completed, and my enthusiasm for all-things "Flash Gordon" positively thriving, I've continued working on four Uranian Royal Guard figures (also) by "Crooked Dice Game Design Studio", Like so many of the uniforms utilised by Emperor Ming, this quartet will be predominantly pigmented in red, so I'm hoping to use the merciless minions as 'test pieces' for a simple palette that I can then apply to all the Alien Legionnaires I also own.

Despite the X-Commandos being thwarted by moving scenery, Sarah Jane wins the day for Tweedy

My hobby fervour has also been greatly enhanced by a first game of "7TV" using the recently-released Core Rulebook. This small-sized head-to-head between the (Space) Duchess, her Jackbooted Sadist and Titan Gladiator bodyguard, against the meddlesome Tweedy Mattison, his companion (Sarah Jane) Meddings, and two X-Commandos was an absolute riot - even if we did resort to using some old Countdown, Gadget and Profile cards rather than use the latest ones.

Foremost of this encounter had to be some incompetent scenery chap moving a ruined wall in front of Mattison's Heroic Extras to thwart their early attempts to overpower my Titan Gladiator (as per "Set Dressing"), and the Duchess seducing one of the X-Commandos. But in the end I twice succumbed to some fiendish "Script Editing" , which saw the show's Stars swap places, eventually allowing Meddings to use her Prototype Jammer a couple of times on-the-trot to take-out my giant mechanical Extra...

Wednesday, 23 August 2023

"What If I'm Stuck Being A Bear Forever..?"

"How am I gonna figure out how the whole changing-into-animals thing works..?"

This 35mm scale model of One Man Zoo in his bear form was created using "Elegoo" Water Washable Resin on a Mars 3 Pro 3D Printer and is available as an STL (Standard Triangle Language) file from "C27 Studio". The sculpt is clearly inspired by Arnold Drake and Bob Brown's co-creation for "DC Comics" - Garfield Mark Logan (a.k.a Beast Boy or Changeling), and seemingly designed to be used as an 'alternative' figure for the Batman Miniatures Game rule-set.

Despite being rather unimpressed with this model's small(ish) size, I still super-glued it to an 'official' "Atomic Mass Games" Marvel Crisis Protocol base, as I originally thought the furry beast had been produced in 40mm scale - in line with the company 's other comic book characters. However, that now appears not to be the case, so disappointingly, all their "DC Comics" figures are noticeably smaller when compared to the larger "Marvel Worldwide" characters, essentially ruining any plans I had to mingle them together.

Both the Confederates and Union suffer with early deployment issues

The figure itself was pretty straightforward to paint and provided an excellent opportunity to test out more bottles from "Duncan Rhodes' Two Thin Coats" range. The bear was therefore primed in Ethereal Green, shaded in Necrosis Green Wash and dry-brushed with (more) Ethereal Green. I then picked out all his claws and nose with some Wyvern Green and Logan's teeth with White Star. These areas were subsequently splashed with "Citadel" Nuln Oil and Agrax Earthshade respectively.

Alongside this rather underwhelming 42mm tall model, I have played my second game of ACW Epic Battles Black Powder over at the Solent Wargamers Club in Portsmouth. As in my first fight I needed to rely upon my good-natured opponent to bolster my Alabama and Florida Infantry Regiments, as well as borrow some additional Confederate cannons. To mix things up a bit we also both fielded some cavalry - which in game can pester flanks and redeploy as skirmishers.

The North's Cavalry unit dismount within some woodland

Having never used horsemen before I thought this was a great addition to the game, and really enjoyed Rick Priestley's easy rules for getting them to perform sweeping gallops along the troopers' lines, as well as the obligatory cavalry charge. Unfortunately, this inexperience did though lead to me somewhat bunching up my initial deployment, with the riders almost colliding with one of my foot regiments as I attempted to form up around a crossroads.

Happily however, things hadn't exactly gone according to plan for the Union either, with the North's four infantry columns squeezing out any opportunity for their artillery battery to open fire without having to navigate some woodland first. This meant for the moment at least, I wouldn't have to worry about President Lincoln's cannons mercilessly pounding away at my forces. But what I didn't take into account was how devastating old Abe's cavalrymen would be once they had dismounted and started sniping at me from the trees.

Johnny Reb's left flank caves in, leading to a desperate clash of cavalry

In fact, once the Yanks were in position firing at my left flank, my Confederate forces were quickly whittled away. So by the time the Union soldiers returned to their horses, I had already lost almost half my force and was facing down a nearly endless line of Northern troopers marching straight towards my remaining men in the centre. This really left me with just one opportunity and resulted into a massive cavalry charge between the two armies' horsemen. It was a close-run clash of sabres and appeared destined to go on for a turn or two more, when my Johnny Rebs shockingly decided to escape the battle and give the field to my victorious opponent.

Friday, 18 August 2023

"Briefly Serving As Commander Of The Confederate District Of Florida..."

"...James Patton Anderson returned to the field in July 1864 during the Atlanta Campaign."

This 15mm scale plastic Confederate Commander is produced by “Warlord Games” and came free on a sprue accompanying Issue 397 of "Wargames Illustrated". The mounted figure is from the Nottingham-based company's "Epic Battles: American Civil War" range and is actually supplied with a square stand. Nevertheless, as I wanted my officers to stand out a bit more on the tabletop, I decided to glue the single-piece model to a thin-lipped 30mm circular base instead.

Both the soldier and his horse were painted almost identically to that of my previously-pigmented Henry DeLamar Clayton using a mixture of “Vallejo” Heavy Blue, “Citadel” Drakenhof Nightshade, “Vallejo” Heavy Brown, “Citadel” Agrax Earthshade, “Vallejo” Steel Grey, "Citadel" Nuln Oil, “Vallejo” Sombre Grey and "Citadel" Abaddon Black. However. as I wanted this particular miniature to represent Colonel James Patton Anderson of the 1st Florida Infantry, I (doubtless quite wrongly) gave his broad-rimmed hat a mix of "Vallejo" Heavy Ochre/"Duncan Rhodes' Two Thin Coats" Skulker Yellow and "Citadel" Agrax Earthshade to represent the famous straw hats worn by those troops.

My Confederate forces are joined by even more Johnny Rebs to face a Union army

Somewhat deflatingly however, having now attended the Solent Wargamers Club in Portsmouth for a couple of trial games of ACW Epic Battles Black Powder, it has become clear that I don't actually need more than one mounted officer for my current force, as a single figure is able to command a seriously sized force. Indeed, having proudly set up my three infantry stands of the 1st Alabama Infantry Regiment, two infantry stands of the 1st Florida Infantry Regiment, and my cannon crew, I needed my extremely forgiving opponent to help bring me up to the minimum four three-stand regiments and three artillery bases with models taken from their own impressive collection of Confederates.

To make matters worse though, once my Johnny Rebs were finally lined up on the battlefield ready to face the Union, my first ever command roll failed leaving my entire battalion stood stationary simply watching the enemy. I'd love to say that this inaction was simply a cunning ruse to fool the North into overconfidently pushing forwards and inadvertently placing their Zouaves in front of their cannon. But that would be somewhat dishonest of me. Suffice to say though, President Lincoln's forces came straight at me, desperately trying to squeeze their infantry lines between a forest and wooden building.

As my Confederate line swings left, old Abe's blue-bellied boys start to take a pounding

Surprisingly, whilst this show of force absolutely terrified me. It also allowed my much more spread out army to pivot its left flank around the side of the aforementioned house, and threaten to rake old Abe's Yankees from two directions. For the next few turns this essentially is just what happened, with the Union's morale slowly being whittled away by some crushing Confederate firepower. Eventually, the blue-bellies by the house completely broke and disappeared from the battlefield, whilst the Zoauves, brutally battered by my cannon, started involuntarily retreating back behind their own artillery pieces.

Sadly however, not everything was going my way, as my freshly-painted 1st Florida Infantry Regiment started to buckle from 'a hard pounding' on my right flank. To be fair, this Confederate contingent was squaring off against the main body of Lincoln's boys. But I was somewhat gutted to see the Straw Hats slowly start moving backwards, and away from the sustained onslaught from which they had been suffering.

The Confederate line holds, despite the eventual loss of the 1st Florida Infantry Regiment

This perhaps inevitable loss did leave both my cannon crews and my right flank badly exposed, as I had deployed my 1st Alabama Infantry Regiment on the left to support my 'encirclement' of the North. Resultantly, I really needed my artillery pieces to do a lot of damage upon the enemy soldiers bravely strung out in line directly in front of them, and after a few more turns where both sides simply mercilessly fired upon one another it was clear that they could just that.

Repeatedly assailed from two sides and doubtless having beginner's luck on my side, the Zoauves and a second (normal) Union infantry regiment decided that a full-on retreat was most definitely the better part of valour. The Yankee's decision to deploy their artillery behind their soldiers had clearly cost them dear, and Johnny Reb had quite astonishing won the day with a surprisingly two-pronged attack which had only occurred because they'd failed their opening command roll...

Wednesday, 22 March 2023

"More Than Seven Thousand Panzer IVs Were Constructed Throughout The Second World War."

"The Panzer IV tank was designed by German engineers before the start of World War II in Europe in 1935."

This plastic 15mm Panzerkampfwagen IV is sold by “Battlefront Miniatures” and can be found inside the company’s “Hit The Beach” starter set for “Flames Of War”. The model consists of a medium tank equipped with "Bazooka Skirts", and is the fourth and final fully-tracked armoured vehicle needed to complete my 50-point strong German Beach Defence Company's Panzer IV Tank Platoon.

Initially primed with two layers of "Vallejo" German Grey. The model was then shaded with "Citadel" Nuln Oil, heavily dry-brushed with (more) "Vallejo" German Grey, and later more lightly dry-brushed with "Vallejo" Sombre Grey. The Panzer IVs' spade, stowage, machine-gun, muffler and tow-cable were subsequently 'picked out' using appropriate combinations of "Vallejo" Gunmetal, "Citadel" Nuln Oil", "Vallejo" Heavy Sienna and "Citadel" Agrax Earthshade. Whilst its tracks were tied in to my usual basing with some "Vallejo" Heavy Sienna, "Citadel" Rakarth Flesh and Agrax Earthshade.

The Americans form up behind as much cover as possible. Whether it be woods or houses

Alongside one of my last submissions to the "Analogue Hobbies Painting Challenge" (AHPC) for this year's event, I have finally settled down to play a game of "Flames Of War" against a Veteran M4 Sherman Tank Company. Unfortunately, I still didn't have my 7.5cm Tank-Hunter Platoon ready for the battlefield, but was able to field a cobbled together 49-point force by upgrading my two Panzergrenadier Platoons and bringing along a sMG42 Machine-Gun Platoon (which doesn't come in the "Hit The Beach" Starter Set).

As this was going to be a 'learning game', it was determined that we'd simply play the Annihilation Mission in the rulebook, with the Americans being the attackers for the purposes of deployment and the Germans rolling to go first. Most of the other rules, such as all infantry starting the game in Foxholes (giving them Concealment and Bulletproof Cover), and all teams starting the game Gone to Ground, were ignored.

Quantity over quality..? Unit wise the Germans vastly outnumbered the Americans

However, it was agreed that my Mortar Platoon would be unable to fire Artillery Bombardments in their first Shooting Step. Something which meant going first probably wasn't as great a proposal for the Germans as it first seemed, albeit I did hope it would allow my Panzer IVs to get first crack at the Veteran M4 Sherman (76mm) Tank Platoon it was facing. Resultantly, as all of my Teams counted as having moved for the first Shooting Step regardless of whether they had or not, I (re)positioned my tanks into a firing line along the shore and moved up all my infantry alongside them - sticking to as much cover amidst the buildings and forests as they could find.

Sadly, I wasn't all that impressed with the firepower of General Heinz Guderian's brainchild when my four Panzer IVs subsequently blazed away with their 7.5cm guns, as they caused just one Allied tank crew to bail out - and the cursed Yanks re-entered their vehicle to return fire shortly afterwards. At least I was safe in knowledge that their 80mm frontal armour would keep them in the battle for at least a second salvo...

The American Shermans tear through the German Panzer IVs like a hot knife through butter

Several shots from the American tanks later and my sole-surviving Panzer IV decided that retreating was the better part of honour by scuttling away to the rear of my lines and off the tabletop. So much for my impregnable Vogtländische Maschinenfabrik manufactured machines. Disappointingly though, my 12cm Mortar Platoon wasn't winning me over either, as having needed and then thrown three sixes to hit the victorious Shermans, I then discovered due to my limited number of artillery stands (you really need more than two) that I had to roll a further three sixes so as to hit my targets. Well that was never going to happen.

Buoyed by their success, the Allied armour sauntered down the battlefield's main road, and dominated the centre of the map. With my own tanks completely gone, I decided to shore up my left flank with a unit of Panzergrenadiers, and trust that their Panzerschreck anti-tank teams would do what my Panzer IV's 7.5cm guns couldn't. In the middle I deployed my maximum strength sMG42 Machine-gun Platoon to ward off the fast-approaching Shermans with some withering fire.

Machine Verses Man - The Shermans gun down the Panzergrenadiers.

Needless to say, at this point things went from bad to worse for the Germans. The American tanks' .50 calibre machine guns tore through the Panzergrenadiers and caused them to seek shelter as quickly as they could. Whilst it suddenly became all too clear that despite being "a powerful weapon capable of firing 1200 rounds per minute" (or at least six dice per team), the "Flames Of War" rules don't allow for sMG42 Machine-gun Platoons to have any effect on armoured vehicles whatsoever. So much for the notion of them pinning the Yanks down in the centre.

Incredibly though, things suddenly turned in the Germans' favour at the last minute, when the Allied Parachute Rifle Platoon arrogantly decided to break cover from some Woodland and stroll towards the second Panzergrenadier Platoon on the right. Two Shooting Steps later and there wasn't an American left standing... and it was a good time to bring our test game to an end as a hard-fought draw - at least for Field Marshal Erwin Rommel's forces.

Wednesday, 14 December 2022

"The Destroyer Is Forged From An Unknown And Enchanted Metal."

"The armour was stored away in the Temple of Darkness, but it was found by Loki."

This 40mm scale miniature of Lazer Face was created using "Elegoo" Water Washable Resin on a Mars 3 Pro 3D Printer and is available as an STL (Standard Triangle Language) file by "C27 Studio". The approximately 70mm tall sculpt is clearly inspired by Stan Lee's comic book co-creation - The Destroyer, and designed to be used as an 'alternative' figure for the Marvel Crisis Protocol rule-set.

Along with a 75mm scale version, the model also comes with its own 50mm circular base. However, as I struggle to print anything of that size flat, I decided to simply print out the rubble upon which the "enchanted suit of armor" stands and then superglue it upon an 'official' spare plastic stand by "Atomic Mass Games". I then used some green-stuff to blend the join in, and primed the entire ensemble with "Citadel" Abaddon Black.

Abe Sapien and Hellboy encounter a Sinister Bird, a Frog Swarm and Supernatural Fires

"Forged by the King of the Norse gods, Odin", I decided to use the miniature as an opportunity to test out some of "Duncan Rhodes Two Thin Coats" I've recently been sent by "Trans Atlantis Games" to trial. Resultantly, I applied a single layer of Sir Coates Silver over Lazer Face, shaded it with "Citadel" Nuln Oil, and dry-brushed it with (more) Sir Coates Silver. I later used a similar process for the rubble, swapping out "Duncan Rhodes Two Thin Coats" colour for "Vallejo" Heavy Bluegrey, and adding some splodges of "Citadel" Agrax Earthshade to the mix to dirty the broken ground up a bit more.

With hindsight I should have taken some additional time checking and trimming away a series of 'pimples' left over from the miniature's supports before I started painting the miniature. However, I didn't properly spot them running down the back of the sculpt's legs until later on, by which time I was almost finished and didn't want to have to re-prime. layer, wash, and dry-brush the re-cleaned area - as that always seems to stand out, in my eyes at least, no matter how careful I try to be to blend the repair work in with the original pigmentation.

A Giant Boss Frog Monster tears the B.P.R.D. field agents apart

In addition to completing the first of my figures by "C27 Studio", I have also managed to play some more "Hellboy: The Board Game" by "Mantic Games", unsuccessfully pitting Anung un Rama and Abe Sapien up against a supposedly mild infestation of Frog Monsters. This adventure really didn't go very well at all, with the Deck of Doom placing the two B.P.R.D. Field Agents onto their back feet almost straight from the start.

Alongside the usual hazards of Frog Swarms and "Supernatural Fires", we experienced a Sinister Bird, "A Heavy Moon" (which stunned the duo completely out of the blue", ,"Ambush" and even a super-powered Frog Monster who was invisible to the naked eye. To make matters worse, the monstrous Boss Frog Creature then descended upon us whilst we lay unconscious in a confined space, quickly splattering Abe's brains all over a wall and sending Hellboy flying into an even smaller adjacent room where he was pummelled to death. Next time we'll be sending in a full-team of four operatives...

Monday, 24 October 2022

"An Eyeless Eidolon Awakened By Thieves."

"A few glorifying statues of the duke with faint remnants of power existed deep in ancient dungeons."

This 28mm scale plastic model of an Eidolon Possessed Sacred Statue is produced by "Wizkids" and can be found as Code RPG-WZK90167 from their Nolzur's Marvellous Miniatures range. The 70mm tall figure is clearly based upon the statue of Moloch which appears on the cover for the "Dungeons & Dragons" (First Edition) Player's Handbook, and even depicts the iconic monster missing one of his jewelled eyes. 

Having based the animated guardian onto a "Games Workshop" 50mm circular stand, the entire figure was treated to a double-helping of "Vallejo" Earth, followed by a positive drenching in "Citadel" Agrax Earthshade. It was then dry-brushed with (more) "Vallejo" Earth and given a lighter dusting of Heavy Sienna to help bring out the sculpt's excellent details.

"Encounter Terrain" WIPs - Frankenstein's Monster, the Wolfman and the Seventh Doctor

I did consider applying some red to the effigy as seen in the June 1978 illustration. But as this colour was caused by a close by fire (which sadly wasn't part of this plastic piece), I decided against such a palette. Instead, I simply used a combination of "Scalecolor" Speed Metal and "Citadel" Contrast colour Flesh Tearers Red for the statue's sole remaining eye.

With my latest Gary Gygax inspired acquisition finished, I have spent some more time progressing a trio of 40mm resin sculpts by Nikola Stankovic I had 3D printed by "Encounter Terrain". The two horror film-based figures are being painted for this month's Zomtober Challenge, whilst I'm planning on using the Seventh Doctor's miniature as a Captain for the "Space Station Zero" rules by "Snarling Badger Studios".

Abe Sapien is unable to save Hellboy from a fiery fate, and is soon overwhelmed by Frog Minions himself

Rather embarrassingly, I have also finally managed to play some "Hellboy: The Board Game" by "Mantic Games" after the Kickstarter exclusive edition has sat untouched on one of my shelves for three and a half years. I had actually hoped to enjoy more of the "fully cooperative experience for one to four players", but ending up spending a good hour or so beforehand looking for some non-existent cardboard Investigation (Clue) Tokens - which were apparently replaced with plastic 3D models for my box during the fund-raising campaign. Doh!

Sadly, the opening scenario proved equally as unsuccessful despite Hellboy and Abe Sapien initially starting out well enough, courtesy of Anung Un Rama's formidably-sized pistol and his companion's deadly harpoon. However, we only managed to move into a single room before a sudden firestorm, followed by a Frog Monster ambush knocked both of our B.P.R.D. Field Agents unconscious. The rule-book suggests that this might not be the end of the game, and perhaps simply initiates the Boss fight much earlier than we'd have liked. But as it wasn't clear if this was the case or not, we called it quits there...

Monday, 17 October 2022

"I Shall Take The Patrol And Destroy Them."

"Halt! Halt, or you will be destroyed."

These four 40mm resin Cybermen were sculpted by Nikola Stankovic and 3D printed by "Encounter Terrain". The miniatures are apparently based upon Eric Saward's incarnation of the Mondasians as depicted in his March 1982 "Doctor Who" story "Earthshock", and even carries the correct Cyber weapon.

The models were all originally primed with a combination of "Citadel" Abaddon Black and "Vallejo" Surface Primer Black. They were then treated to a couple of coats of "Vallejo" Gunmetal. before being heavily drenched in "Citadel" Nuln Oil. To finish the figures off, I applied a combination of "Scalecolor" Speed Metal and "Citadel" Flesh Tearers Red to the power cylinder of each Cyberman's hand-weapon.

"Battlefront Miniatures" WIPs - Three German Riflemen having their details 'picked out'

Moving on from science fiction to historical wargaming I am hoping to play some more "Flames Of War" next month using my 50-point German Beach Defence Company. As a result I have been beavering away on the additional plastic 15mm “Battlefront Miniatures” I need to field a second (maximum-strength) German Panzergrenadier Platoon, with the aspiration that I'll soon move on to a Panzer IV Tank Platoon and accompanying 7.5cm Tank-Hunter Platoon.

"Searchers after horror haunt strange, far places."

In addition, I was fortunate enough this past weekend to attend a session of Eldritch Horror by "Fantasy Flight Games" at the Nuneaton Games Club. This was a terrific six-hour tussle by eight noble investigators against the Great Old One Cthulhu, which definitely had its twists and turns for my own character, the elderly Parapsychologist - Agatha Crane. To be honest, I wasn't initially all that impressed with Wilbur's headstrong wife and her disconcertingly low strength to begin with.

However, the character's ability to pass Clue Encounters quickly elevated her to becoming a crucial part of humanity's collaboration to defeat the cosmic entity threatening all Mankind. Indeed, Agatha became an instant success when she surprisingly retrieved the much-needed Sword of Y'ha-Talla from Tokyo during the game's opening turn - the only weapon capable of hurting the truly terrifying Queen of the Deep Ones, who was already threatening to annihilate our band of worthy heroes in the name of Cthulhu.

"For them are the catacombs of Ptolemais, and the carven mausolea of the nightmare countries."

Sadly, Agatha eventually succumbed to hypothermia during the coming of another Ice Age, and was replaced late in the game by the ex-convict Skids" O'Toole. This 'heavy hitter' certainly looked formidable enough as he came armed with a hand-axe, but the bank robber lost his weapon almost straight away and went completely barking mad once Cthulhu successfully physically manifested himself on the planet...

Wednesday, 14 September 2022

"Many Of His Men Were Won Over With Promises Of Glory Or Oaths Of Loyalty."

"And many more followed Horus simply because they always had."

This pair of 28mm plastic Space Marines are by "Games Workshop" and come from the now OOP (Out Of Production) Burning Of Prospero boxed game. The multi-part figures have been assembled wearing MK III armour, and will form part of a Sons of Horus Tactical Squad for the Horus Heresy. Both figures were initially undercoated with "Citadel" Sons Of Horus Green, before being heavily washed with Nuln Oil, and dry-brushed with (more) Sons Of Horus Green.

I then applied some "Citadel" Abaddon Black to their shoulder-pads, as well parts of their backpacks and Bolters. The models' power tubes and firearms were subsequently treated to a combination of "Vallejo" Gunmetal and "Citadel" Nuln Oil. Whilst I 'picked out' all the ridges on their shoulder-pads and helmet brows with a little "Vallejo" Gold. These areas were later given a splash of "Citadel" Agrax Earthshade and highlighted with some additional touches of "Vallejo" Gold on the sharpest edges and rivets.

Gondor lines up against the formidable forces of Lurtz and Isengard's fighting Uruk-hai

With two more of my Sons of Horus space marines completed, I also managed to participate in another 500 point skirmish using the "Middle Earth: Strategy Battle Game" rules by "Games Workshop". This time my Isengard force simply faced a similarly-sized army of Gondor in a fight "To The Death!" using the rule-book's second scenario. Once again though we slightly reduced the recommended set-up measurements to better accommodate the three foot square table we were using.

To mix things up from my previous victory, and learn a bit more as to how effective archery can be in the game, I decided to line my Uruk-hai scout archers on my left flank facing Beregond's unit of archers. This shoot-out ultimately just showed how difficult it is to actually hit anyone with arrows when using bows, albeit over the course of the battle my leather-clad "Orc-folk" were slowly whittled down by their better armoured human opponents.

Gandalf unsuccessfully attempts to overcome the magical might of the White Wizard, Saruman

In the centre I placed Lurtz along with his contingent of fighting Uruk-hai and Bezerkers. Initially, these faced across some ruins at Gondor's swordsmen and spearmen. But during the fight I quickly split most of my Bezerkers off to the right so as to tackle my opponent's Knights of Minas Tirith. Quite surprisingly, this proved to a most wise decision, as my ferocious fighters easily withstood the inevitably cavalry charge, and then chopped both Knight and horse to pieces before the battle was over.

This massacre then allowed my Bezerkers to rejoin my Uruk-hai who were battling Gondor's increasingly beleaguered swordsmen, and soon afterwards there was little doubt that Isengard would be victorious once again. However, one of the best moments in the entire game was Saruman's sorcerous duel with Gandalf, which at one point looked likely to see my (true) White Wizard roast his Olórin alive with a devastating Flameburst...

Monday, 5 September 2022

"You Are An Infiltration Prototype."

"Cyborgs don't feel pain."

This 28mm scale metal Killbot is manufactured by "Crooked Dice Game Design Studio", and can be bought individually as Killbot A, or as part of the four-figure deal - SKU: DEAL 347. The single-cast model was undercoated with "Vallejo" Heavy Grey, washed in "Citadel" Biel-Tan Green, dry-brushed with "Vallejo" Gunmetal, and subsequently shaded using plenty of "Citadel" Agrax Earthshade.

I then applied some "Mig Productions" Extreme Rust Wash to its joints, and blended this in with a dry-brush of (more) "Vallejo" Heavy Grey, allowing some of the previously-applied "Vallejo" Gunmetal to still shine through. Finally, its weapon was treated to a combination of "Citadel" Abaddon Black, "Vallejo" Heavy Charcoal, and "Citadel" Nuln Oil. I also dotted its eyes using some "Scalecolor" Speed Metal as a base layer, and later dabbed a little "Citadel" Flesh Tearers Red over these areas.

Beregond shockingly finds his position assailed by deadly Uruk-hai Bezerkers within the opening turn

With the third of my Killbots completed, I also managed to play some "Middle Earth: Strategy Battle Game" by "Games Workshop", fielding my current 500 point Isengard force against a similarly-sized army of Gondor. As this was our first fight using the rule-set for quite some time we played the opening scenario - Domination, slightly reducing the recommended set-up measurements to better accommodate the three foot square table we were using.

Considering that both sides could immediately deploy up to the halfway point of the battlefield, the main aim of both armies was to push the other back so as to claim the larger share of five scattered objective markers. To this end I placed my Uruk-hai scout archers on the edge of a forest on my right flank, relying upon their "Woodland Creature" special ability to allow them to melt into the undergrowth if frontally assaulted, and 'Heroically Moved' Lurtz and his Bezerkers straight towards Beregond's archer unit on my left. This provided the White Wizard, Saruman, plenty of room in the centre to deal with any threats.

Beregond dies whilst battling Lurtz as Gondor looks to its centre and left flank for victory

This bold move clearly threw Gondor into complete disarray as both the Knights of Minas Tirith and Gandalf repositioned themselves, and allowed Lurtz to smash straight into Beregond's terrified troops. Unsurprisingly, my fierce Bezerkers hacked the armoured human archers to pieces, and soon buried their so-called champion alongside them. In addition, Saruman appeared more than a match for a unit of Gondor swordsmen who thought they'd secure the central objective, courtesy of a Sorcerous Blast and The Palantir.

Gondor discovers just how brittle its Knights of Minas Tirith actually are

Reeling from these early blows, Gandalf made a beeline straight for my Scout archers, hoping to catch the leather-clad Uruk-hai in a pincer move with the splendid-looking Knights of Minas Tirith. However, a few flights of arrows actually managed to fell one of the armoured riders and cause them to go their separate ways - with a pair even wheeling right back around and moving to help the survivors of Beregond's poorly performing band.

This change in the cavalry's direction set-up one of the highlights of the game as Saruman managed to hurl a Knight into another rider with another Sorcerous Blast, outright killing the first and unsaddling the second. With Gondor's entire right flank eradicated, and Lurtz sweeping towards the centre, Gandalf's only hope was to attack my Scout archers and then follow it up with a charge from some remaining Swordsmen.

Isengard's Uruk-hai Scouts fend off some of Gondor's better-armoured soldiers

A Sorcerous Blast from Shadowfax's rider definitely got my Uruk-hai Scouts out into the open. But with orc blades drawn, and lead by a Captain, the unit still managed to hold their own against the better armoured infantry of Gondor. Indeed, before long, my Isengard forces had completely whittled away their opponents to a quarter of their starting number and collected numerous victory points with their mastery of the objective markers. A well-won victory for the White Wizard was in the books...